The Manager App is the restaurant owner's and managers' companion to the POS. It runs as an installable Progressive Web App on your phone (or any browser) and is designed for the work that doesn't happen at the register: photographing supplier invoices, reviewing what the OCR pulled off them, watching food cost and price-change trends, flagging ingredients that haven't been reordered in a while, controlling which items the POS can sell right now, and looking up the latest price you paid for any ingredient.
The app is mounted at /manager-app/ on your merchant server. The first time you open it on a phone you can use the browser's "Add to Home Screen" / "Install" prompt to install it; from then on it behaves like a native app, complete with an offline mode that keeps reading from a local cache when you're away from the restaurant.
1. Signing in
The app uses Google sign-in. Tap Sign in with Google on the launch screen and pick the Google account that has been invited as a manager or owner of this restaurant. Only accounts whose role is manager or owner will be admitted; other roles are signed straight back out.
If you've been emailed an invite link, the link opens the app in invitation-acceptance mode, which shows you the restaurant name and the email the invite was issued to, and a single Sign in with Google to Accept button. Use the same Google address as the one in the invite or the server will refuse to link you.
Sessions last 24 hours; the access token is refreshed silently in the background about every 20 hours. When the server can't be reached — because you're off-site and the appliance is on a restricted network, or your phone is offline — the app stays signed in and falls back to a cached snapshot. A header banner reading "Off-site – showing cached data" or "Not at restaurant – POS sync disabled" appears whenever you're in this mode.
2. The app shell
Once signed in, every screen shares the same chrome:
- A header bar at the top with the screen title in the middle, an optional back arrow on the left (only on the receipt-detail and report-detail screens), and a three-dot menu on the right.
- A bottom navigation bar with four tabs: Receipts, Reports, Sync, and Prices. Tapping a tab swaps the main content area without leaving the app.
The four tabs are the four top-level destinations of the app, and the rest of this manual is organized around them.
3. Receipts
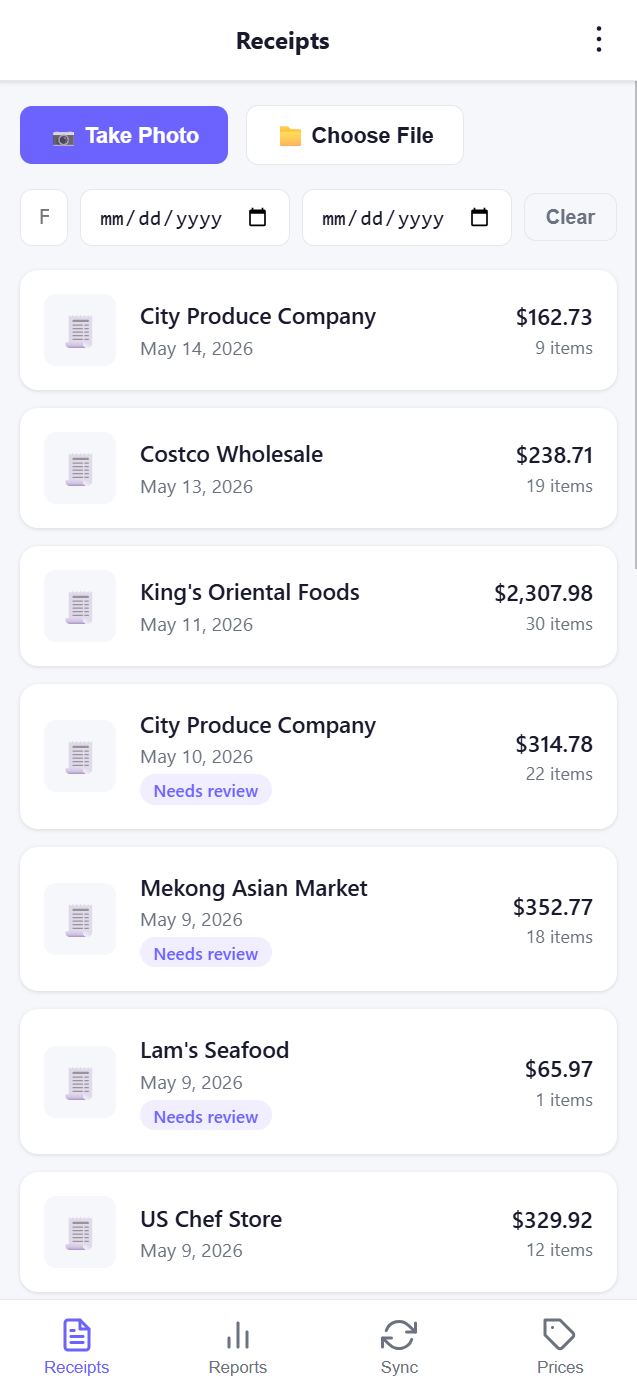
The Receipts tab is the home screen. It is where you photograph supplier invoices, watch them being uploaded and OCR'd, fix anything the OCR got wrong, and browse the full receipt history.
3.1 Capturing a receipt
The two big buttons at the top do the work:
- Take Photo opens the phone's camera so you can snap one or more pages of an invoice. Tap the shutter for each page; the app stages them in memory rather than uploading immediately.
- Choose File opens the phone's file picker so you can grab images that are already on the device (for example, a PDF that a supplier emailed you and that you screenshotted).
Once you have at least one file staged, a preview card appears between the buttons and the list. It tells you how many files are ready to upload, lets you remove any of them individually by tapping the × on its thumbnail, and exposes a Supplier dropdown. The dropdown is pre-populated with every vendor that already exists in your receipt history; leave it on "— New supplier —" if you want the OCR to detect the vendor itself, or pick an existing supplier to force the receipt into that bucket (handy when the photo of the letterhead is unreadable).
When you're ready, tap Upload. The receipt is added to the IndexedDB queue with status Queued and a small pending badge appears next to the upload buttons showing how many receipts are still in-flight. A Service Worker takes care of actually uploading; if your phone is offline at the moment, it will wait until the network comes back. Failed uploads show with status Error and a Retry / Discard pair of buttons so you can act on them yourself.
The 50 MB-per-file limit means an unusually large photo will be rejected before it ever enters the queue. The accepted file type is any image (JPG, PNG, HEIC, etc.); PDFs are not supported directly — screenshot or export them as images first.
3.2 Filtering the receipt list
Below the upload bar is a filter row with three controls: a free-text vendor filter that matches anywhere in the supplier name, a from-date, and a to-date (mm/dd/yyyy). Clear resets all three. The vendor filter is debounced 250 ms, so typing into it does not hammer the list while you're still typing.
Filters apply only to the persisted server receipts. Anything currently in the upload queue (queued, uploading, or error) is always shown at the top so you cannot accidentally filter away a failure.
3.3 Receipt cards
Each row in the list represents one receipt and shows the supplier name, the receipt date, the total amount, and the number of line items the OCR extracted. A "Needs review" lavender chip appears under the date for any receipt whose status is still parsed — that is, the OCR finished but a human hasn't yet locked the line items in. Tap any card to open the receipt.
The list paginates at 20 rows; the Prev / Next controls at the bottom are only shown when there are more than 20 matching receipts.
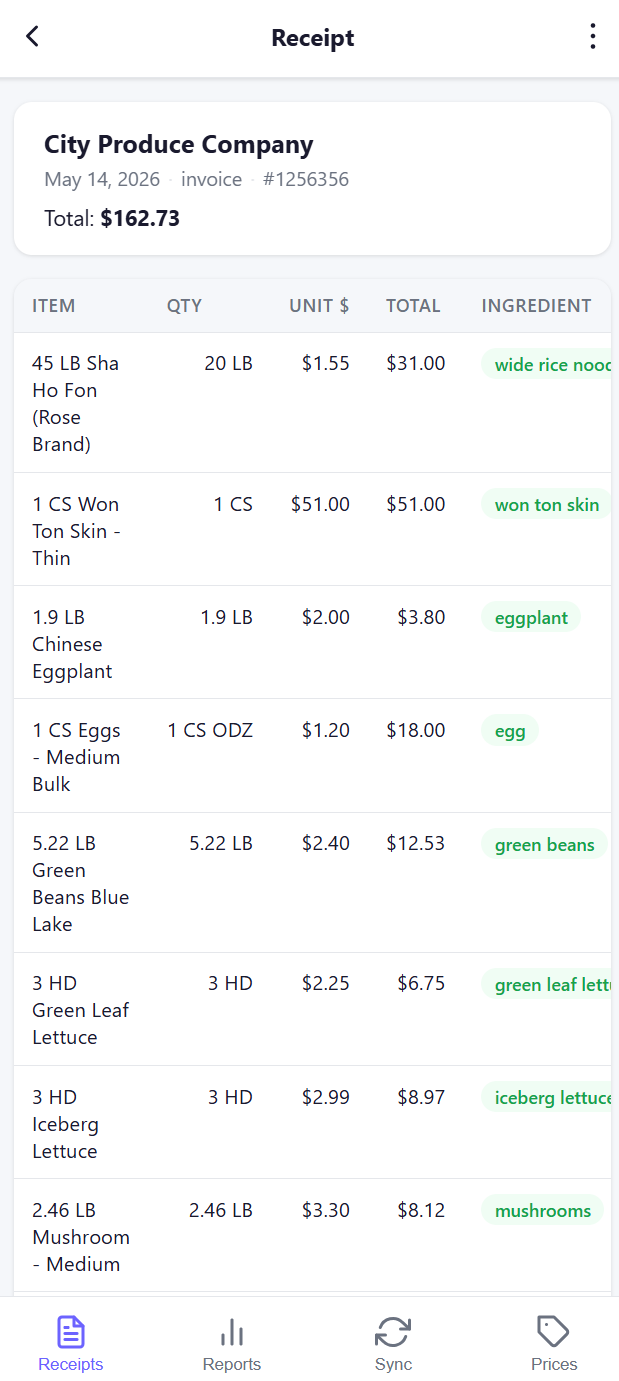
3.4 The receipt detail screen
Tapping a card opens a read-only detail screen for receipts that have already been locked. The header shows the supplier, the date, the document type (receipt, invoice, …) and the document number if one was captured, and the total. Underneath, the line-item table shows every line item with its description, quantity, unit, unit price, total, and a green ingredient pill that tells you which master ingredient that line was mapped to. Lines that did not match any ingredient show as a grey "Unlinked" badge instead.
An Edit button at the bottom flips the page into editable mode. Edit mode is also the default for receipts whose status is still parsed — the OCR has just finished and you need to confirm the numbers.
In edit mode each line item becomes a small editable card with:
- A Description field.
- A 4-cell grid of Qty, Unit, Unit $, and Total.
- An Ingredient field that doubles as a search box and, via the + New button, an inline form for creating a fresh ingredient on the fly (with a category dropdown — protein, vegetable, sauce, spice, dairy, or other). Newly-created ingredients are picked up by the price reports immediately.
Lines that are currently unmatched are flagged with a "Needs ingredient" red chip and a thin red border so you can spot them at a glance. Lines whose total is negative show a "Discount" badge instead — the OCR commonly sees negative subtotals as supplier credits and you should leave these as discount lines, not promote them to a real ingredient.
You can delete a line entirely with the × in its header, or add a new blank line with + Add Line at the bottom. Save & Lock writes your edits back to the server, flips the receipt's status from parsed to review (locked), and returns you to the receipt list, where the "Needs review" chip on that card disappears.
4. Reports
The Reports tab is a six-card menu. Each card opens a dedicated report screen with its own controls.
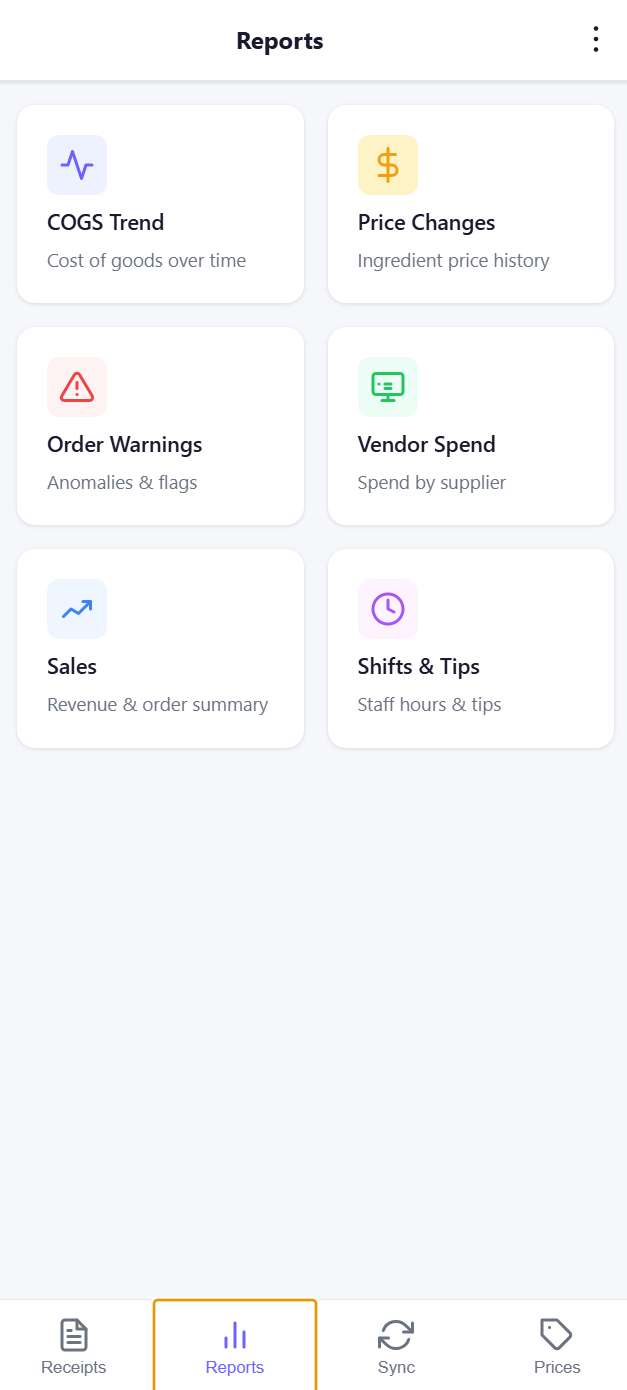
The six reports are COGS Trend, Price Changes, Order Warnings, Vendor Spend, Sales, and Shifts & Tips. All of them are cached locally — once you've opened one with the app online, it will continue to render the cached version while you're off-site, with an "Offline — showing cached data" banner at the top so you know what you're looking at.
4.1 COGS Trend
Cost of goods spent over time, computed from the totals on every locked receipt. The top bar shows the grand total for the visible range and a Weekly / Monthly toggle; switching granularities re-fetches from the server and re-renders the bar chart. Bars are labelled with their period (e.g. 2026-W17 for ISO week 17 of 2026, or month names in monthly mode) and stamped with a short dollar value above each ($4.5K, $340, etc.) so you can compare at a glance without reading the axis.
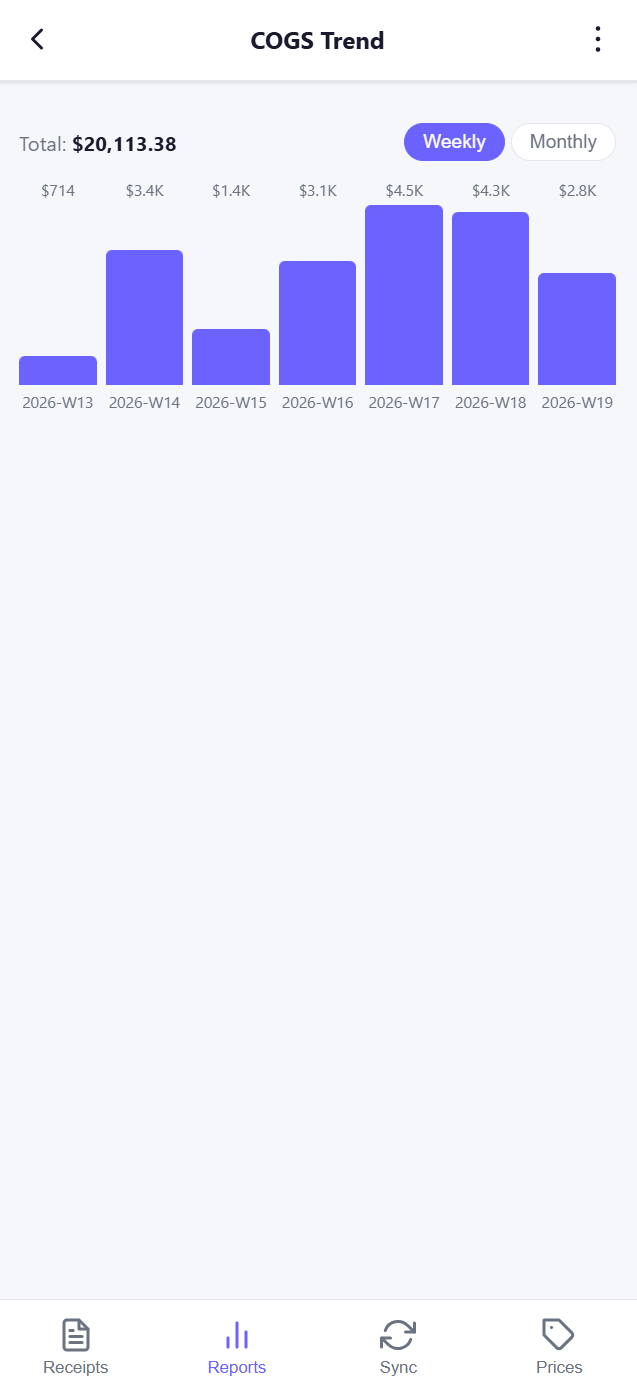
The chart shows up to 12 periods of history.
4.2 Price Changes
The Price Changes report is the one you'll probably look at most often. It is organized into four tabs across the top:
- Last Receipt — every line on your most-recently-locked receipt, with the previous price you paid for that ingredient (from any vendor, with the vendor name shown when it differs from the current one), the new unit price, and the percent change. Items where the previous price came from a different supplier still appear so you can compare across vendors.
- Last Purchase — the most recent ingredient-level change, regardless of which receipt it came from. One row per ingredient.
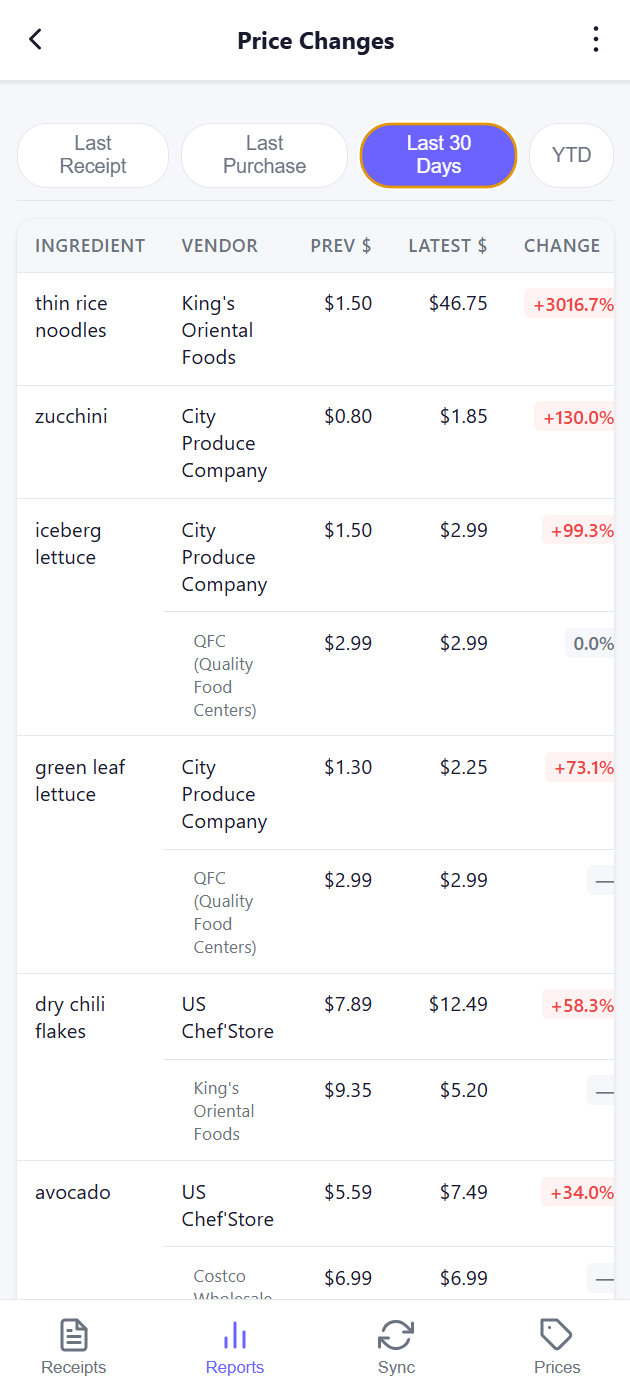
- Last 30 Days — every ingredient whose unit price has moved over the last 30 days, grouped by ingredient with one row per vendor. Tapping a row reveals an inline 30-day sparkline of that vendor's unit price.
- YTD — same layout as Last 30 Days but the baseline is the first purchase price of the year.
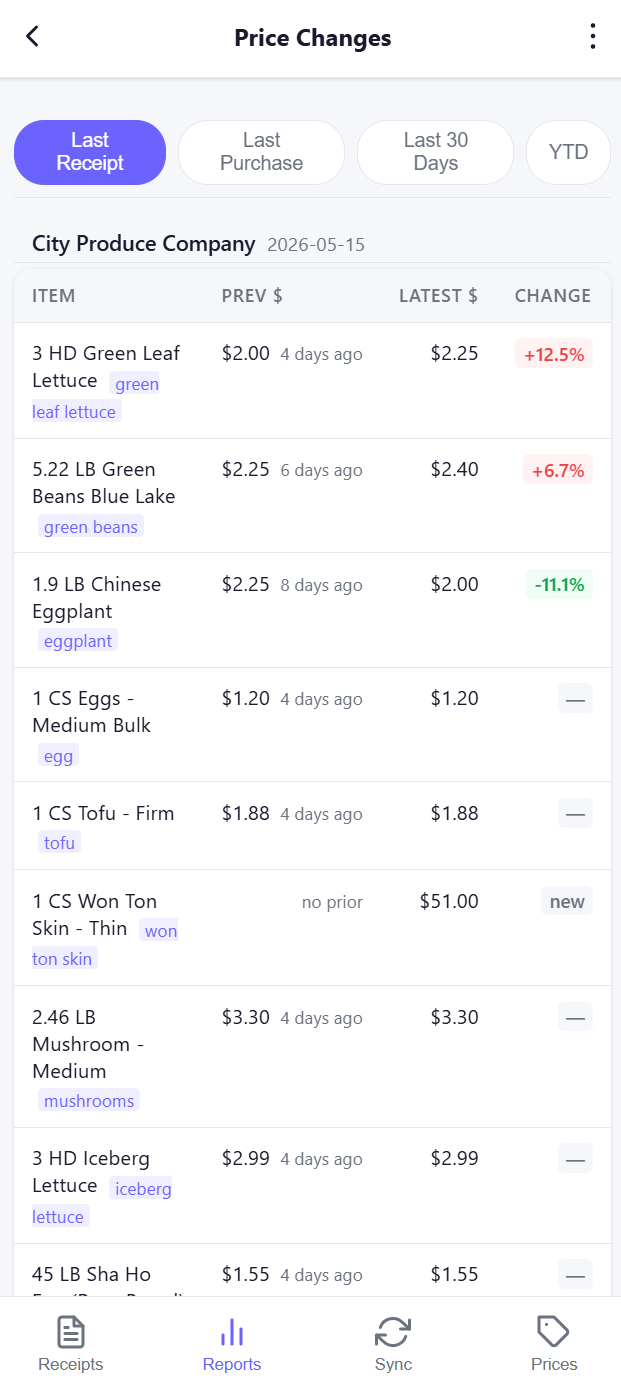
Within each tab, rows are sorted by the biggest increase first; flat or "no prior" rows fall to the bottom. The Change column is colour-coded: red for an increase greater than 5 %, green for a decrease greater than 5 %, neutral otherwise. "new" appears in place of a percentage for an ingredient you've never bought before, and "no prior" appears in the Last Receipt tab for items the OCR couldn't match against any prior history.
The Last 30 Days and YTD tabs group multiple vendors for the same ingredient — the ingredient name is shown once in a row-span on the left, with each vendor on its own line on the right. Tapping any of those vendor lines expands a sparkline showing the unit price trajectory for that vendor / ingredient pair.
4.3 Order Warnings
A list of ingredients that are "overdue" — that is, more time has elapsed since the last time you ordered them than your normal reorder interval suggests is healthy. Each row shows the ingredient name, the last-ordered date, the average reorder interval that the system has learned for that ingredient, and how many days overdue it currently is. Tap Snooze 7d to dismiss a warning for one week (handy when you know a shipment is on the way). When nothing is overdue, the screen shows a green checkmark and "No order warnings."
4.4 Vendor Spend
A vendor-by-vendor month-over-month spend report. A dropdown at the top selects which vendor you're looking at; below it is a monthly bar chart of that vendor's total spend, and a table of every month for the last 12 months showing total spend and the month-over-month percent change. The MoM column is colour-coded with the same red / green thresholds as Price Changes (±10 %).
4.5 Sales
The only report sourced from POS orders rather than from receipts. Three preset buttons — This Month, Last Month, and Last 30 days — plus a from/to date picker and an Apply button let you pick any window. The screen shows three summary cards (Revenue, Orders, Avg Order) and a daily breakdown table beneath them. The default range is the last 30 days.
4.6 Shifts & Tips
A two-tab report (Shifts / Tips) over the same date-range bar. The Shifts tab lists every employee shift with clock-in, clock-out, and duration in hours. The Tips tab lists tip totals per employee per day. Both default to the last 30 days.
5. POS Sync
The Sync tab controls ingredient availability — which ingredients the POS is allowed to sell right now. Each ingredient has a toggle: green means available, grey means 86'd. The list is grouped by category (protein, vegetable, sauce, spice, dairy, other) so you can scan the kitchen's pantry quickly.
At the top of the screen is a location card that's green when the app detects it is on the restaurant's network, and amber when it isn't. POS sync is intentionally only allowed from on-site — the toggles are disabled and tooltipped "You must be at the restaurant to sync with the POS." whenever you're off-site. This is deliberate: 86'ing an ingredient from a remote location would silently change what customers see on the ordering site without anyone in the kitchen knowing, and the team learned to wire it up this way after an early incident where exactly that happened.
Toggling an ingredient applies optimistically — the UI flips immediately — but reverts and surfaces a small red banner if the server rejects the change.
6. Prices
The Prices tab is the offline-first ingredient price lookup. Type any ingredient name (e.g. broccoli) into the search box and the app filters the locally-cached price snapshot, returning one card per (description, vendor, unit) combination with the most recent unit price you paid. Cards include the vendor and the date of the latest purchase. Tap a card and the bottom of the screen renders a 30-day sparkline of that vendor's unit price for that ingredient, plus a small Live badge if the server was reachable and the chart was fetched fresh.
This screen is designed for the case where you're standing in a different supplier's warehouse and want to know what you paid your usual vendor for the same item last week. The search uses the IndexedDB snapshot, so it works even with the phone in airplane mode — only the sparkline chart needs the network. If the chart fails to load (offline, or no second data point) you'll see "Chart unavailable offline." or "Only 1 purchase in the last 30 days — not enough data for a chart." instead.
A background prefetch refreshes the price snapshot in IDB on every successful sign-in, so the offline view is rarely more than a few minutes stale when you were last online.
7. Working offline
The Manager App is built for the case where the manager is not always physically at the restaurant. Two distinct "offline" modes exist:
- Off-site mode — you're authenticated but the server is unreachable (typically because the merchant appliance's IP allowlist is rejecting you). A purple banner reads "Off-site – showing cached data. Connect to the restaurant network to sync." Receipts you took photos of are queued in IndexedDB and will upload as soon as the connection is restored. POS sync toggles are disabled. Reports render from their cached snapshots with an "Offline — showing cached data" banner.
- Hard offline — the phone has no network at all. Same behaviour as off-site mode plus the Service Worker takes over caching the app shell so the PWA still boots from the home-screen icon.
In both cases the Prices tab keeps working at full fidelity for searches; only the live chart is unavailable. Receipts keep being staged and queued — Background Sync wakes the Service Worker up to upload them later. Reports render the last good copy and quietly refresh themselves when you come back online.
8. Inviting other managers (owners only)
If your role is owner, the Manager App is also where you invite other people. Owner-only routes such as POST /api/merchants/:id/manager/invites create a single-use invite token, persist it server-side, and email the recipient a link of the form /manager-app/accept?token=…. The email is sent through the merchant's own SMTP credentials, so the From address matches your restaurant. When the recipient opens the link, the app shows them the invitation-acceptance screen described in §1 and binds their Google identity to your merchant on first login. Owners can revoke a manager's access at any time from the dashboard.
Managers cannot invite other managers; only owners can.
9. Operational notes
A handful of details worth knowing once you've used the app for a while:
- Status flow. A receipt moves through
queued→uploading→parsed(OCR done, awaiting review) →reviewed(locked). The OCR's line items are written to the database the moment parsing finishes, so they show up in COGS Trend, Vendor Spend, and Price Changes right away — but anything still labelled Needs review in the list is unreviewed numbers and should be confirmed promptly so a misread digit doesn't sit in your dashboards for long. - Ingredient matching. During review the app does a substring match between each line description and your existing ingredient catalogue (display name or canonical name, longer than two characters, case-insensitive). When a match exists the ingredient pill is pre-filled and the link is saved when you tap Save & Lock. The substring-match approach was chosen on purpose so that "5.22 LB Green Beans Blue Lake" still snaps to the
green beansingredient automatically. - Discounts. Lines with a negative total are flagged and not treated as ingredient purchases. Leave them in the receipt — they're needed for the total to reconcile — but don't bother assigning them to an ingredient.
- Vendor names. The supplier dropdown on the capture screen and the vendor filter on the list both pull from the unique vendor names found in your existing receipts, so they get more useful the more receipts you've uploaded.
- Caching. Three layers of cache cooperate to keep the app working offline: the Service Worker caches the app shell, IndexedDB stores the upload queue plus a price snapshot and per-endpoint API caches, and
localStoragekeeps a small profile cache so the app can boot straight into offline mode without waiting for the server. - Service Worker. If you ever see stale data after a deploy, fully closing and reopening the PWA usually resolves it — the Service Worker swaps to the new app shell on the next launch.
10. Quick reference — daily routine
A typical day for a manager looks like this:
- Suppliers drop off invoices in the morning — snap each one with Take Photo as it arrives. Queue them and walk away; OCR runs in the background.
- Before lunch, open Receipts and review every card that still says Needs review. Tap, confirm the numbers, link any unmatched lines to ingredients, and Save & Lock.
- If a delivery was missing something, head to Sync and 86 the relevant ingredients so the POS stops selling them.
- Around closing, glance at Reports → Price Changes (Last Receipt tab) for anything wildly different from last week, and at Order Warnings for anything overdue.
- Weekly or monthly, scan COGS Trend and Vendor Spend for the bigger-picture story.
That's the loop. Snap, review, lock, react.