The Point-of-Sale Dashboard is the operator console for the restaurant: it runs on the tablet at the front counter and on any browser the owner or manager points at the merchant appliance. From it you ring orders, manage the menu, watch sales, run the timesheet, take reservations, sell gift cards, 86 items, log compliance events, and monitor the health of the printers and terminals.
It is built as a single-page Progressive Web App; on iPad and Android you can "Add to Home Screen" to install it as a kiosk-style app. The left sidebar is the master navigation, the top bar shows the title of the section you're in, and an orange / red banner appears across the top if the appliance loses its network connection.
This manual walks through each sidebar section, in the order they appear in the menu.
1. Signing in and switching staff
The first time the dashboard loads it asks you to authenticate. Owners and managers sign in with their full credentials and stay signed in until they explicitly press Sign out at the bottom of the sidebar.
Restaurants that have multiple staff working a shift can enable Employee Mode (Employees → toggle in the top right). When Employee Mode is on, the dashboard locks itself behind a numeric PIN keypad, and every server or chef taps their own code to enter. Their name appears as a chip in the top bar with a one-tap Clock Out button next to it. The Switch Employee button at the bottom of the sidebar drops the dashboard back to the keypad without signing the owner out.
This separation matters for the reports: tips, sales totals, and shift hours are all attributed to whichever employee was active when the orders were taken or the clock was punched.
2. Store Profile
This is the landing page after sign-in and the home base for everything specific to the restaurant — name, contact info, payment provider, online-ordering toggles, tax and service-charge presets, table layout, weekly hours, and manager invitations. Most of the form is conventional; two parts are worth describing in detail.
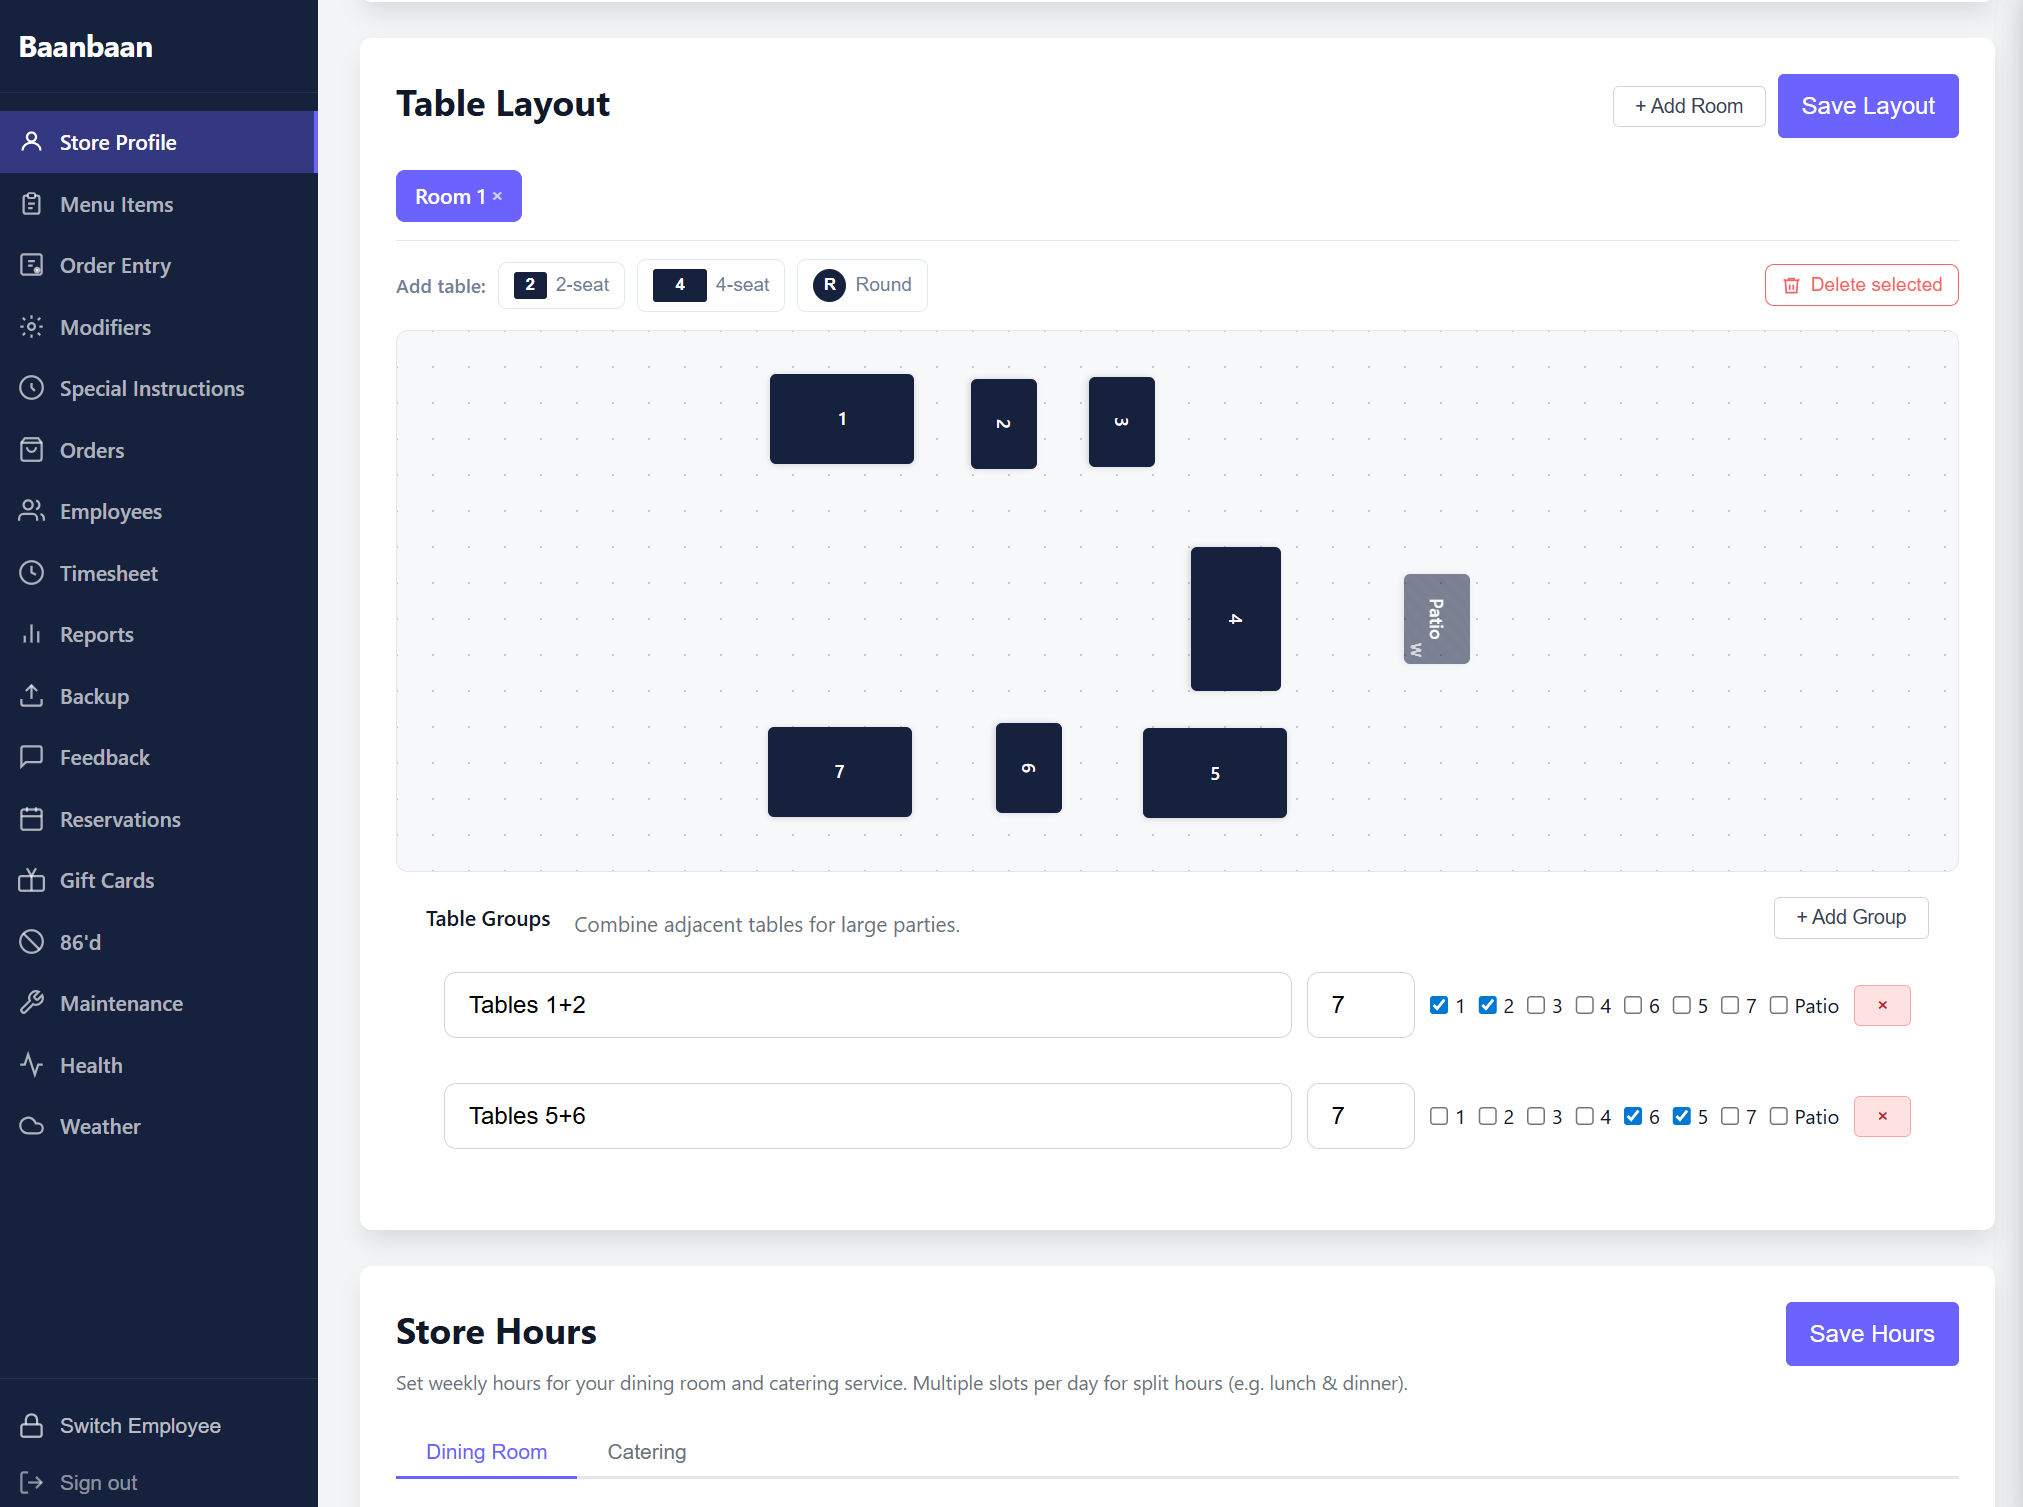
2.1 Table Layout
The Table Layout card is a visual editor for the dining room. Each room (you can have several with + Add Room) is a free-form canvas onto which you drop tables. The toolbar above the canvas offers four shapes — 2-seat, 4-seat, 6-seat, and Round — and a Delete selected button. Drag any table to position it; the layout is saved when you press Save Layout in the header. Tables can also be marked as Patio so they appear in a separate group on the Order Entry screen.
Underneath the canvas is the Table Groups editor, which lets you pre-define adjacent combinations for large parties: you give the group a seating capacity and tick the tables that compose it. When a party of nine sits down, the server picks the "Tables 1+2" group and the order is associated with both physical tables at once.
2.2 Store Hours
A weekly schedule for the dining room and for catering, on two separate tabs. Each day can have multiple time slots — useful for split hours (lunch 11:00–14:00, dinner 17:00–22:00). The hours feed the customer ordering site (so a 9 pm online order is blocked if you close at 8) and are used by the maintenance alerts that fire when something is overdue.
The same Store Profile section also has a Deploy Update button in the header — it pulls the latest code from your source repo and restarts the appliance, used only when your administrator asks you to.
3. Menu Items
The Menu Items section is where every dish, every category, every photo, and every per-item modifier group lives. It is the source of truth that feeds both the Order Entry screen and the customer-facing ordering site.
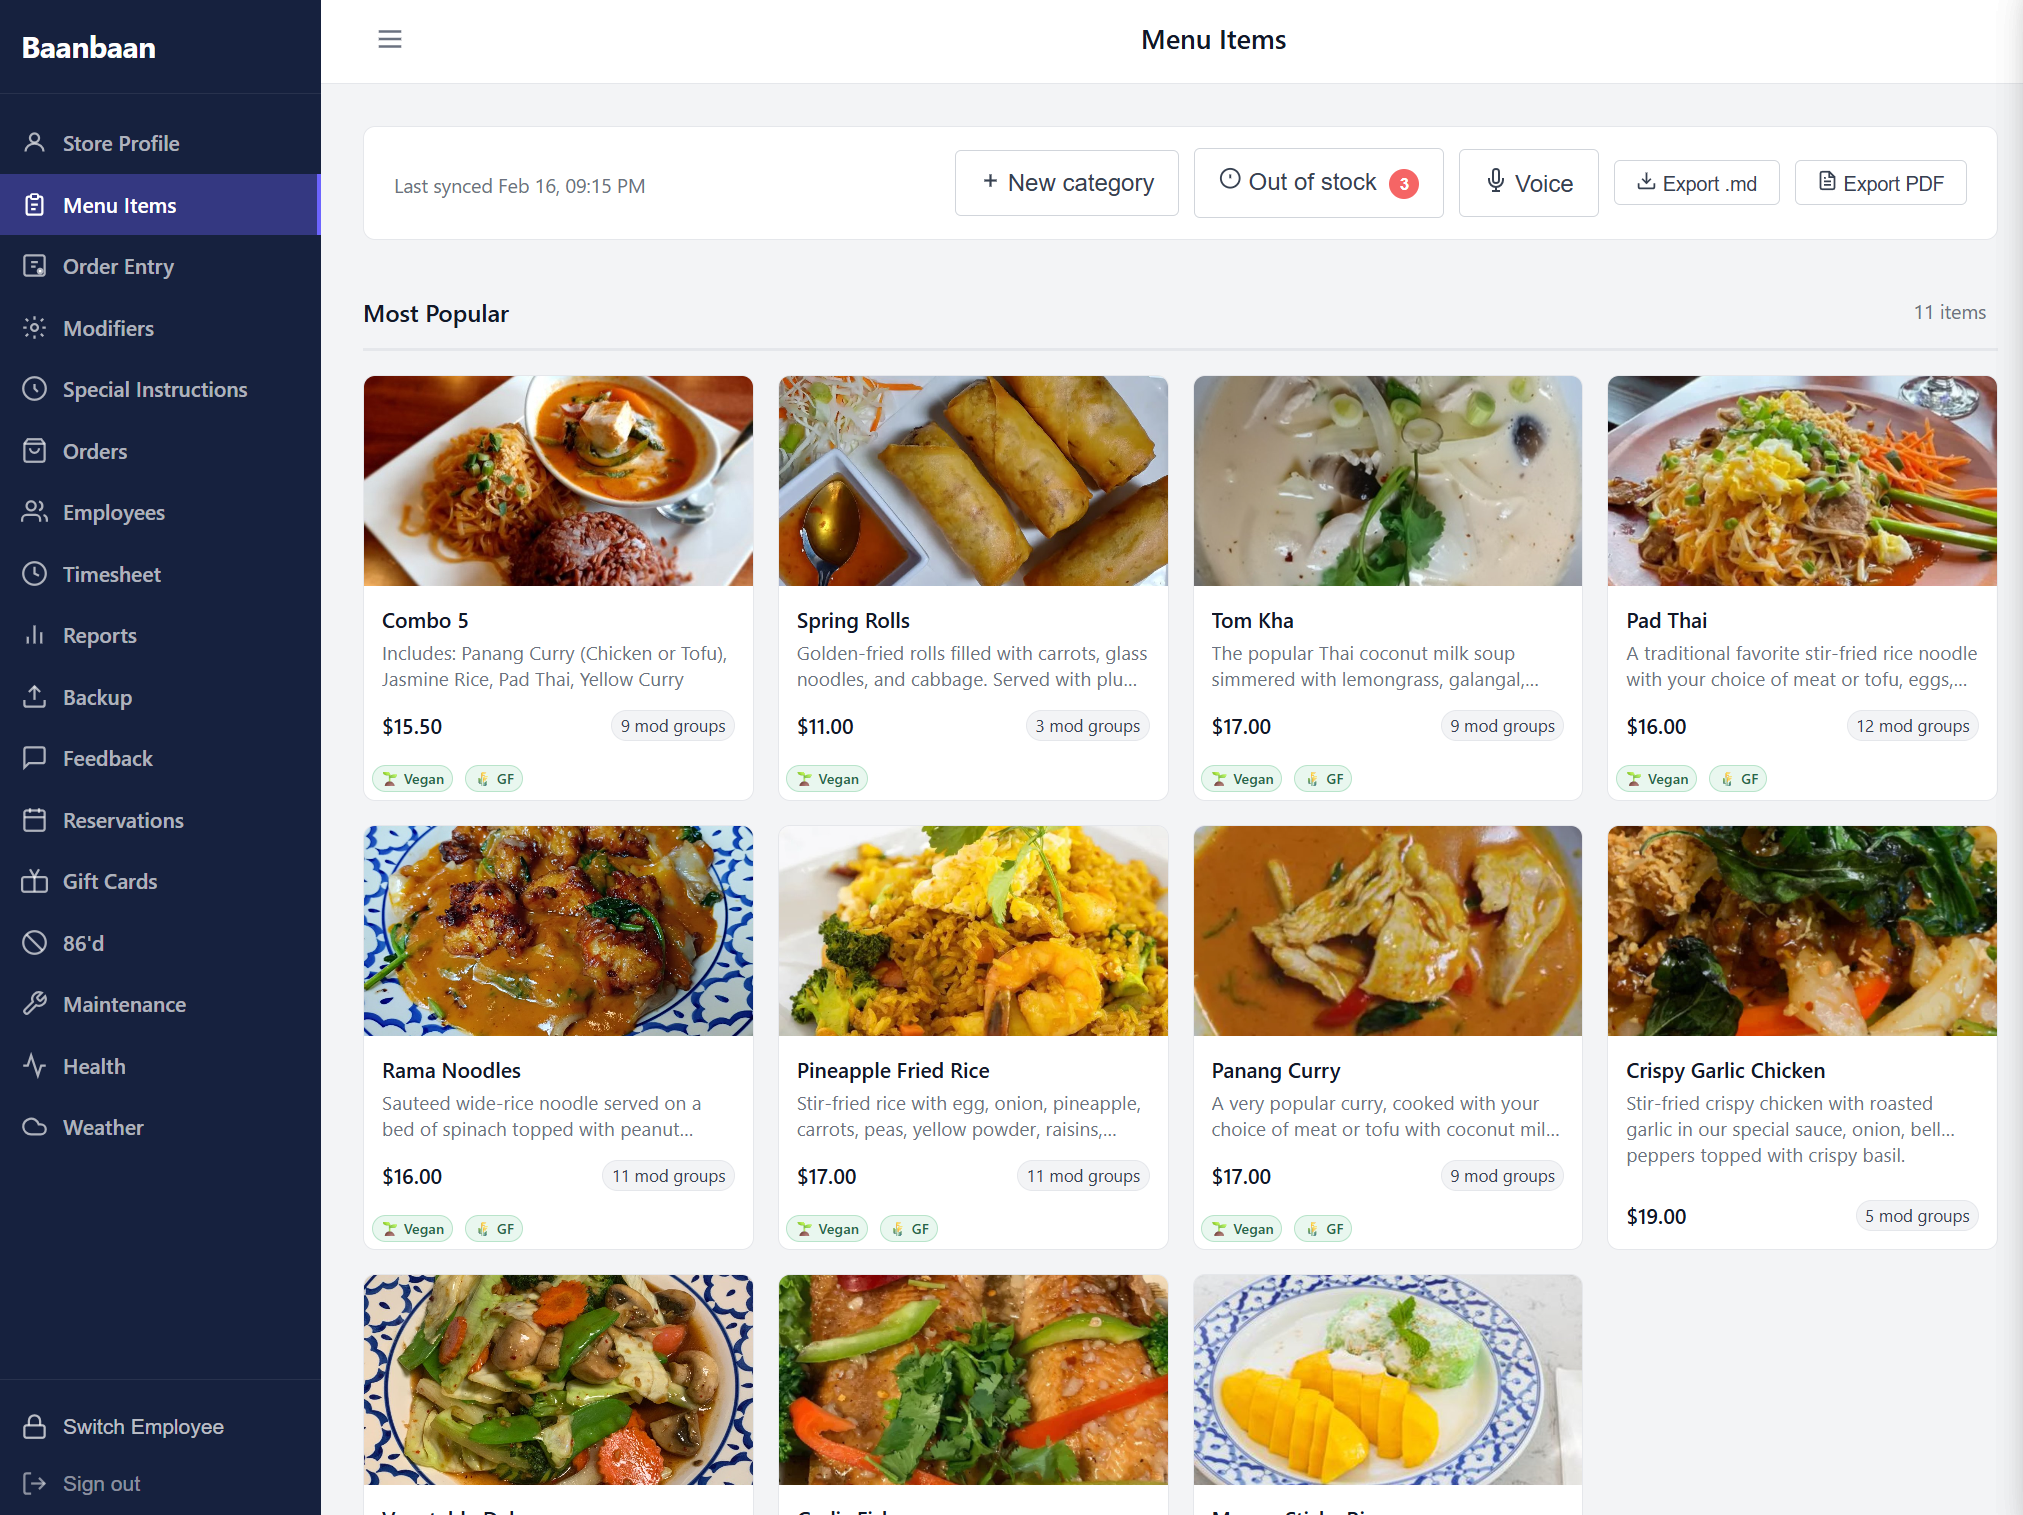
The toolbar above the grid shows the time of the last menu sync and offers six controls: + New category to add a new section, an Out of stock chip (numbered with the current 86'd count — a shortcut to the 86'd screen), a Voice button that lets you toggle items in and out of stock hands-free (press V or tap it, then say "Pad Thai out" / "Pad Thai back"), Export .md to dump the entire menu as Markdown, and Export PDF to generate a print-ready PDF in your choice of paper size (Letter, Tabloid, Legal, Half Letter, 4×6) and orientation, optionally including item photos.
The grid itself shows each category as a panel; tap any card to slide in the Edit Item drawer where you can change the name, price, description, photo (cropped to 1024 × 768), and the modifier groups assigned to that dish. Photos are uploaded by clicking the photo area or dragging onto it.
A Most Popular virtual category appears at the top automatically — it's a derived view of the dishes that sell the most, useful both for ringing orders quickly and for spotting which items might need a price refresh.
4. Order Entry
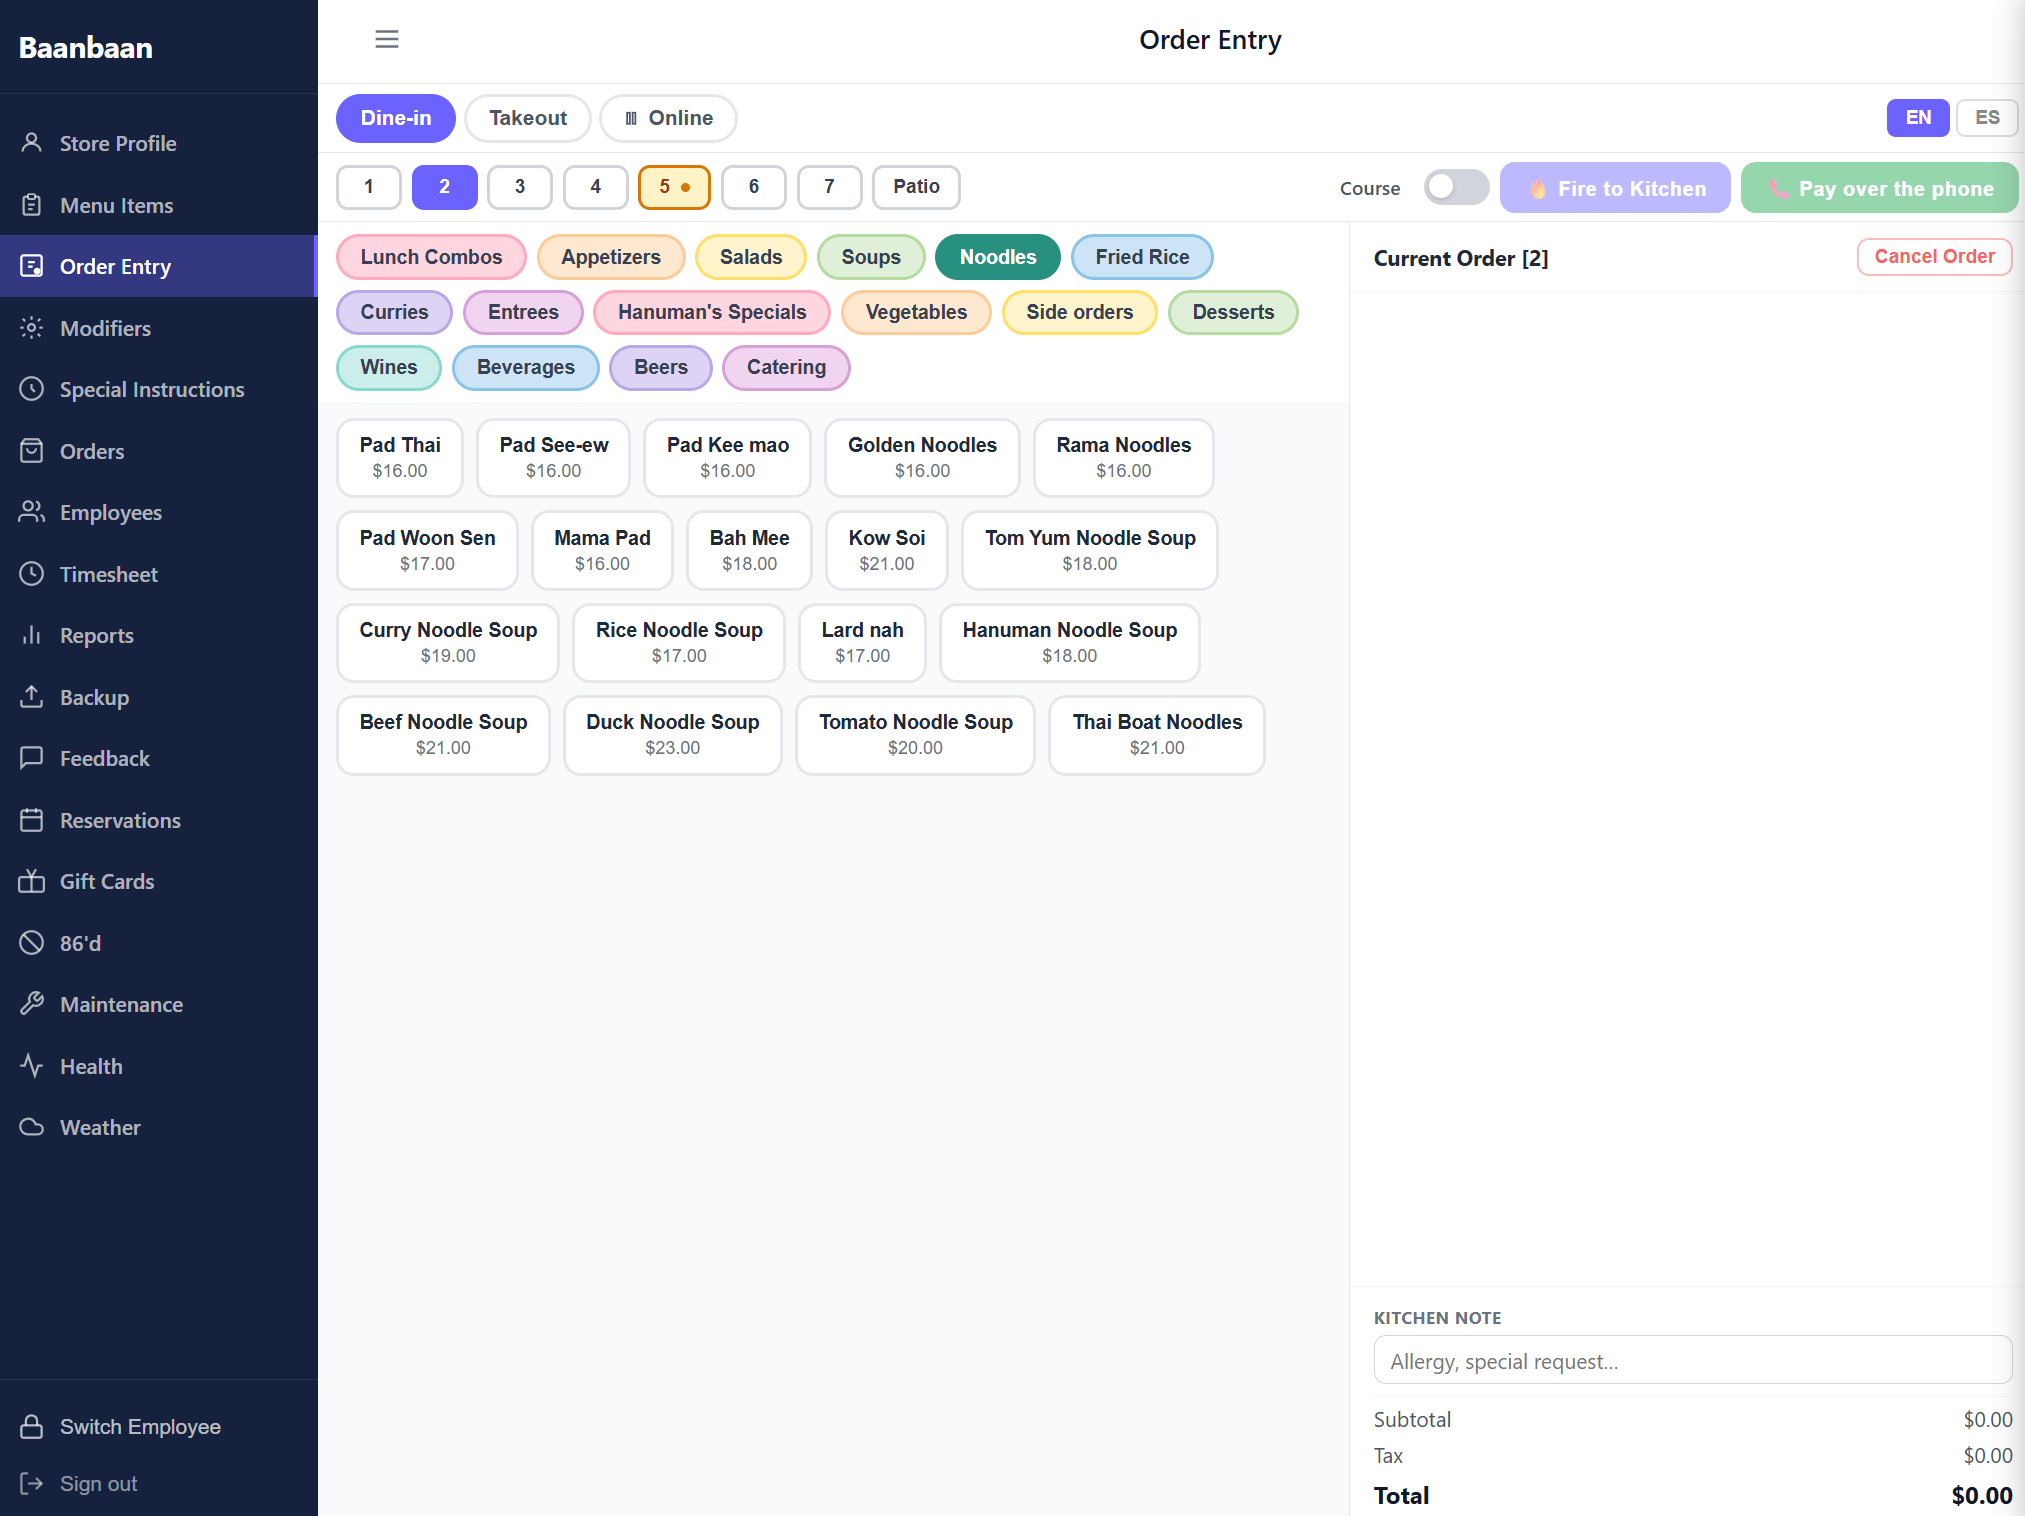
This is the screen the servers and counter staff live in. It is a landscape, two-column layout designed for a 10" tablet: the left side is the menu browser, the right side is the current order, and a strip across the top has the order type, table grid, and the action buttons.
4.1 Order type and tables
The top-left segmented control switches between Dine-in, Takeout, and Online (the Online pill is also a one-tap pause for the customer ordering site — press it to stop accepting online orders, press it again to resume).
In Dine-in mode the strip across the middle shows the table grid: a row of pills for each defined room ("1 / 2 / 3 / 4 / 5 / 6 / 7 / Patio" in the screenshot above) followed by the action buttons. The currently selected table is highlighted; the colour of each table pill reflects its status (empty, ordered, fired, awaiting payment).
A small Course toggle next to the Fire button enables coursing: when on, the kitchen ticket prints in stages rather than all at once.
4.2 Building an order
The left column has category tabs across the top (Lunch Combos, Appetizers, Salads, Soups, Noodles, Fried Rice, Curries, Entrees, Hanuman's Specials, Vegetables, Side orders, Desserts, Wines, Beverages, Beers, Catering) and a grid of items underneath. Tap any item to add it to the order; if the item has modifier groups, a customization modal opens and walks the server through every required choice (protein, spice level, etc.) before the item lands in the right panel.
The right panel ("Current Order") shows each line with its quantity, modifiers, and price. Two free-text fields underneath let you attach a Customer name and a Kitchen note (allergies, special requests); a third Ready by time field appears for takeout orders. The totals row shows subtotal, tax, and grand total, all updating live.
4.3 Sending and paying
When the order is ready, the action strip exposes:
- 🔥 Fire to Kitchen — sends the ticket to the kitchen and counter printers. The button is disabled until at least one item is added.
- 📞 Pay over the phone (Takeout) / Pay Dine-in / Pay Cash / Pay Counter / Pay by phone — payment options that vary based on order type and the payment provider configured in Store Profile.
- Cancel Order in the order panel header — drops the in-progress order after a confirmation dialog ("Cancel this order? All items will be removed.").
- Move Table — only shown when an active dine-in order is selected; reassigns it to a different table.
The bottom-right of the top strip has an EN / ES language toggle that switches the kitchen ticket between English and Spanish. The same screen also supports parking an order ("Stash") and resuming it later from the banner that appears under the type bar.
5. Modifiers
The Modifiers section is the catalogue of modifier groups — the reusable bundles of options that get attached to dishes (Protein choice, Spice level, Sauce, Add-ons, etc.). Each group is shown as a card with its name, a REQUIRED chip if appropriate, and a one-line summary of which dishes use it.
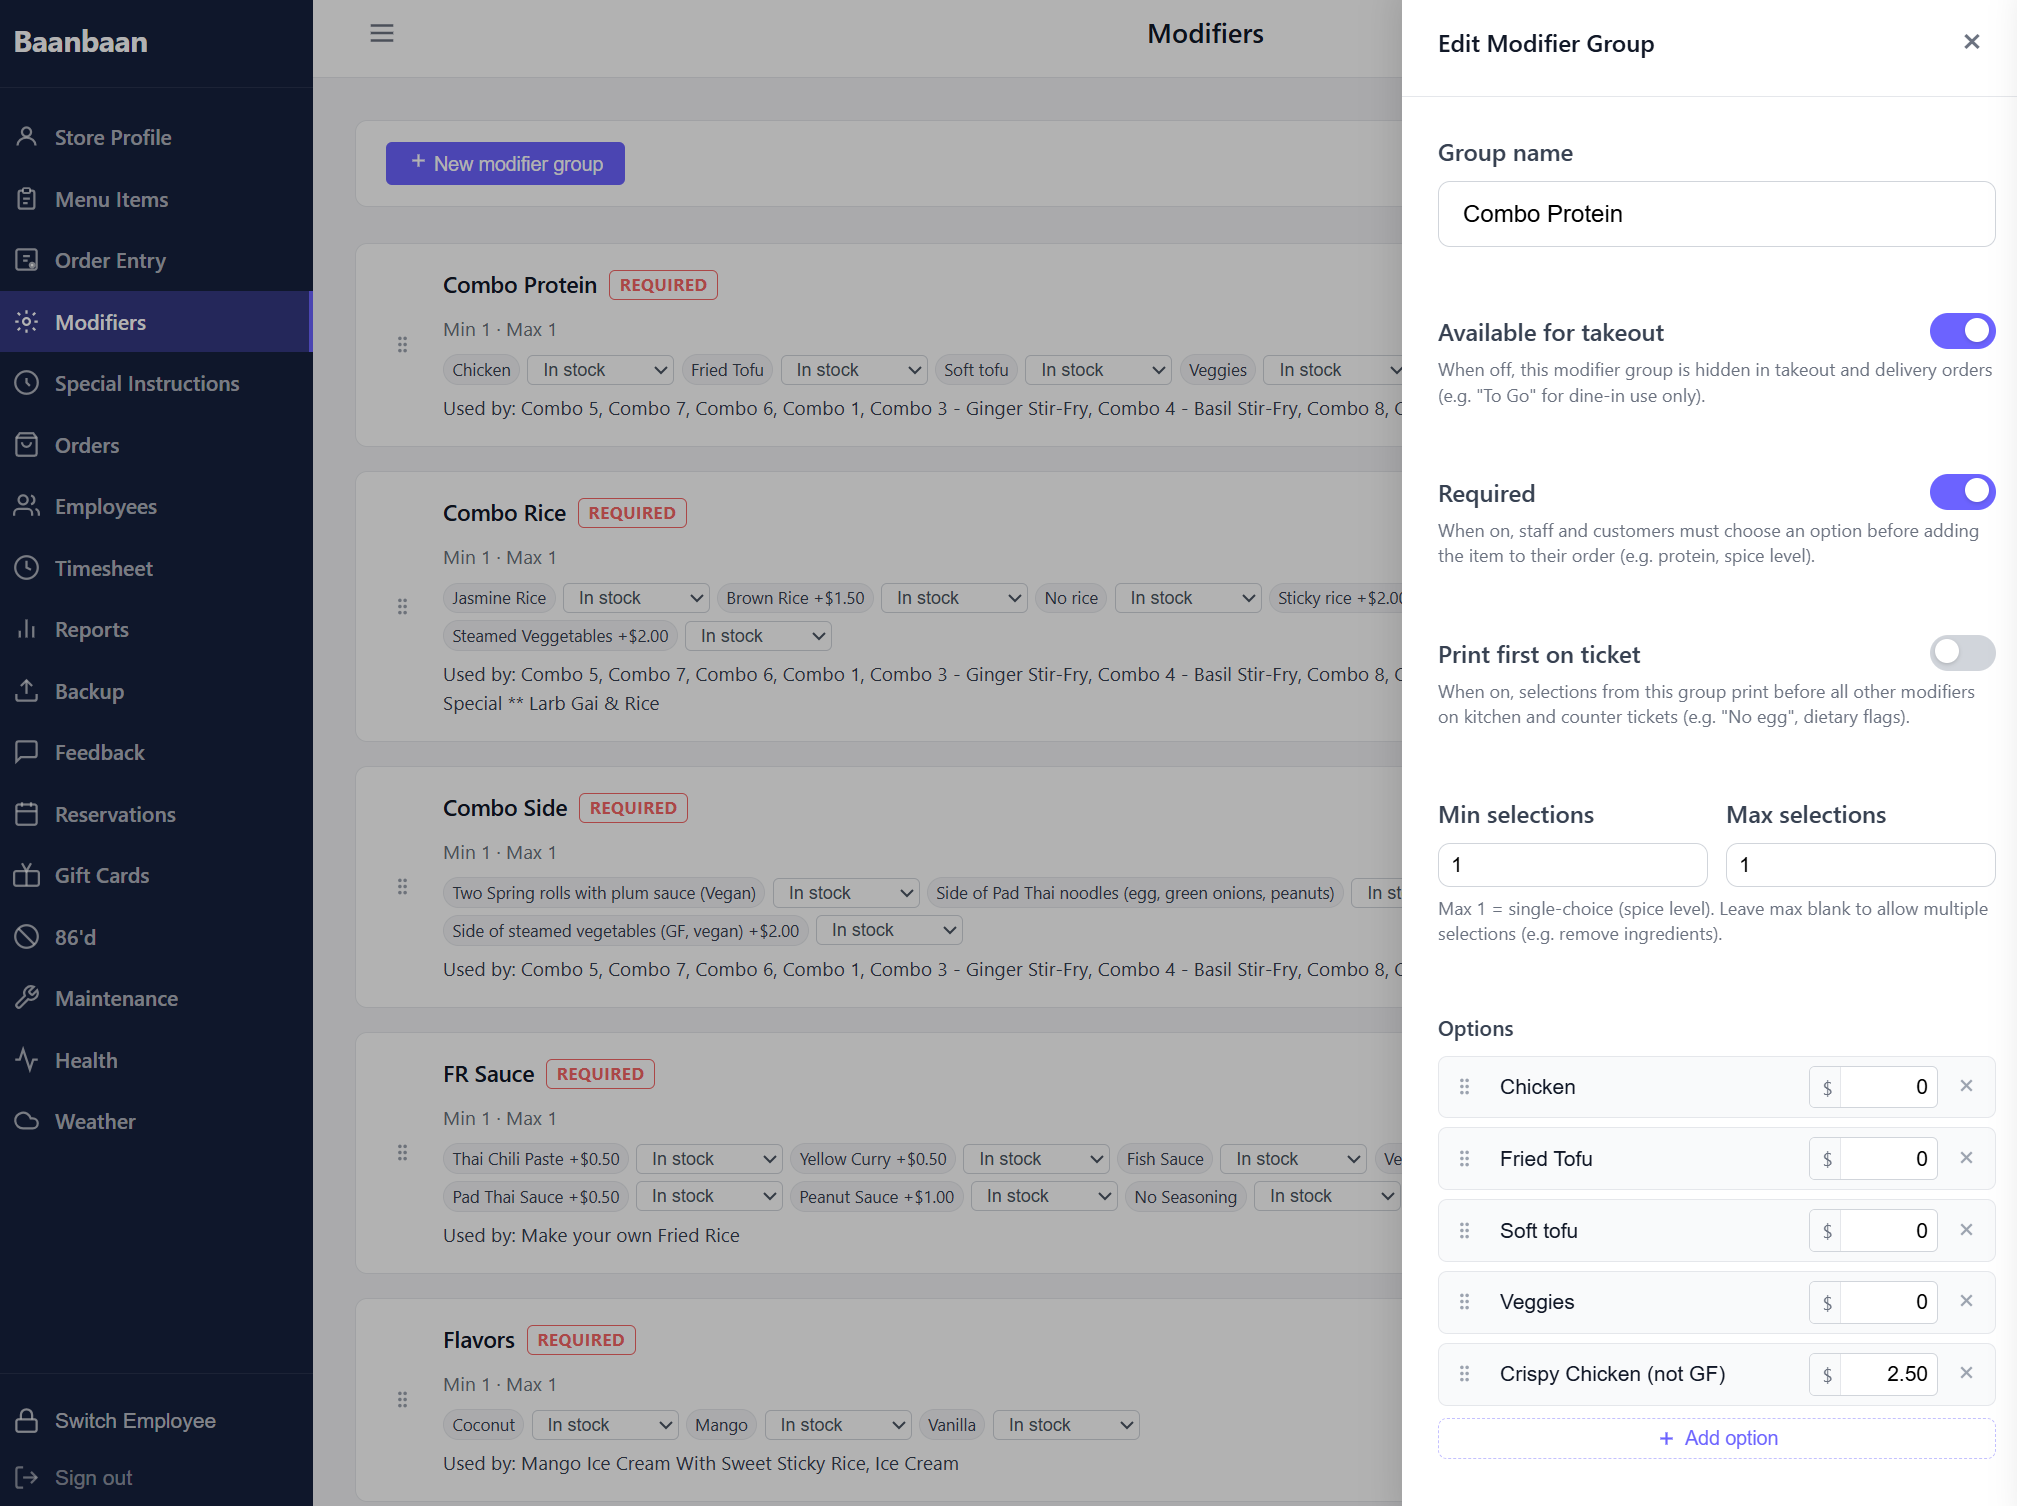
Tapping a card opens the Edit Modifier Group drawer:
- Group name — display name.
- Available for takeout — when off, the group is hidden in takeout and delivery (use this for dine-in-only options like "To Go" boxes or table-side service).
- Required — when on, staff and customers must pick an option before the item can be added (protein, spice level, etc.).
- Print first on ticket — when on, the group's selections print before any other modifiers on the kitchen ticket; useful for dietary flags or "no egg" notes that the cook needs to see first.
- Min selections / Max selections —
Max 1means a single-choice (like spice level); leave Max blank to allow multiple selections (like "remove ingredients").Min 1makes the group de-facto required. - Options — the actual choices with their price delta (e.g.
Crispy Chicken (not GF) +2.50). Each option has a separate stock count for 86-ing. - Assigned dishes — chips showing every dish that includes this group, with a + Add dish picker to extend it across more items at once.
The list as a whole is reorderable, and removing an option that has been used in past orders is non-destructive: the history continues to reference the (now-deleted) name.
6. Special Instructions
This is where you tune what the AI does when a customer types a free-form note like "no peanuts, extra spicy". The screen has two distinct parts.
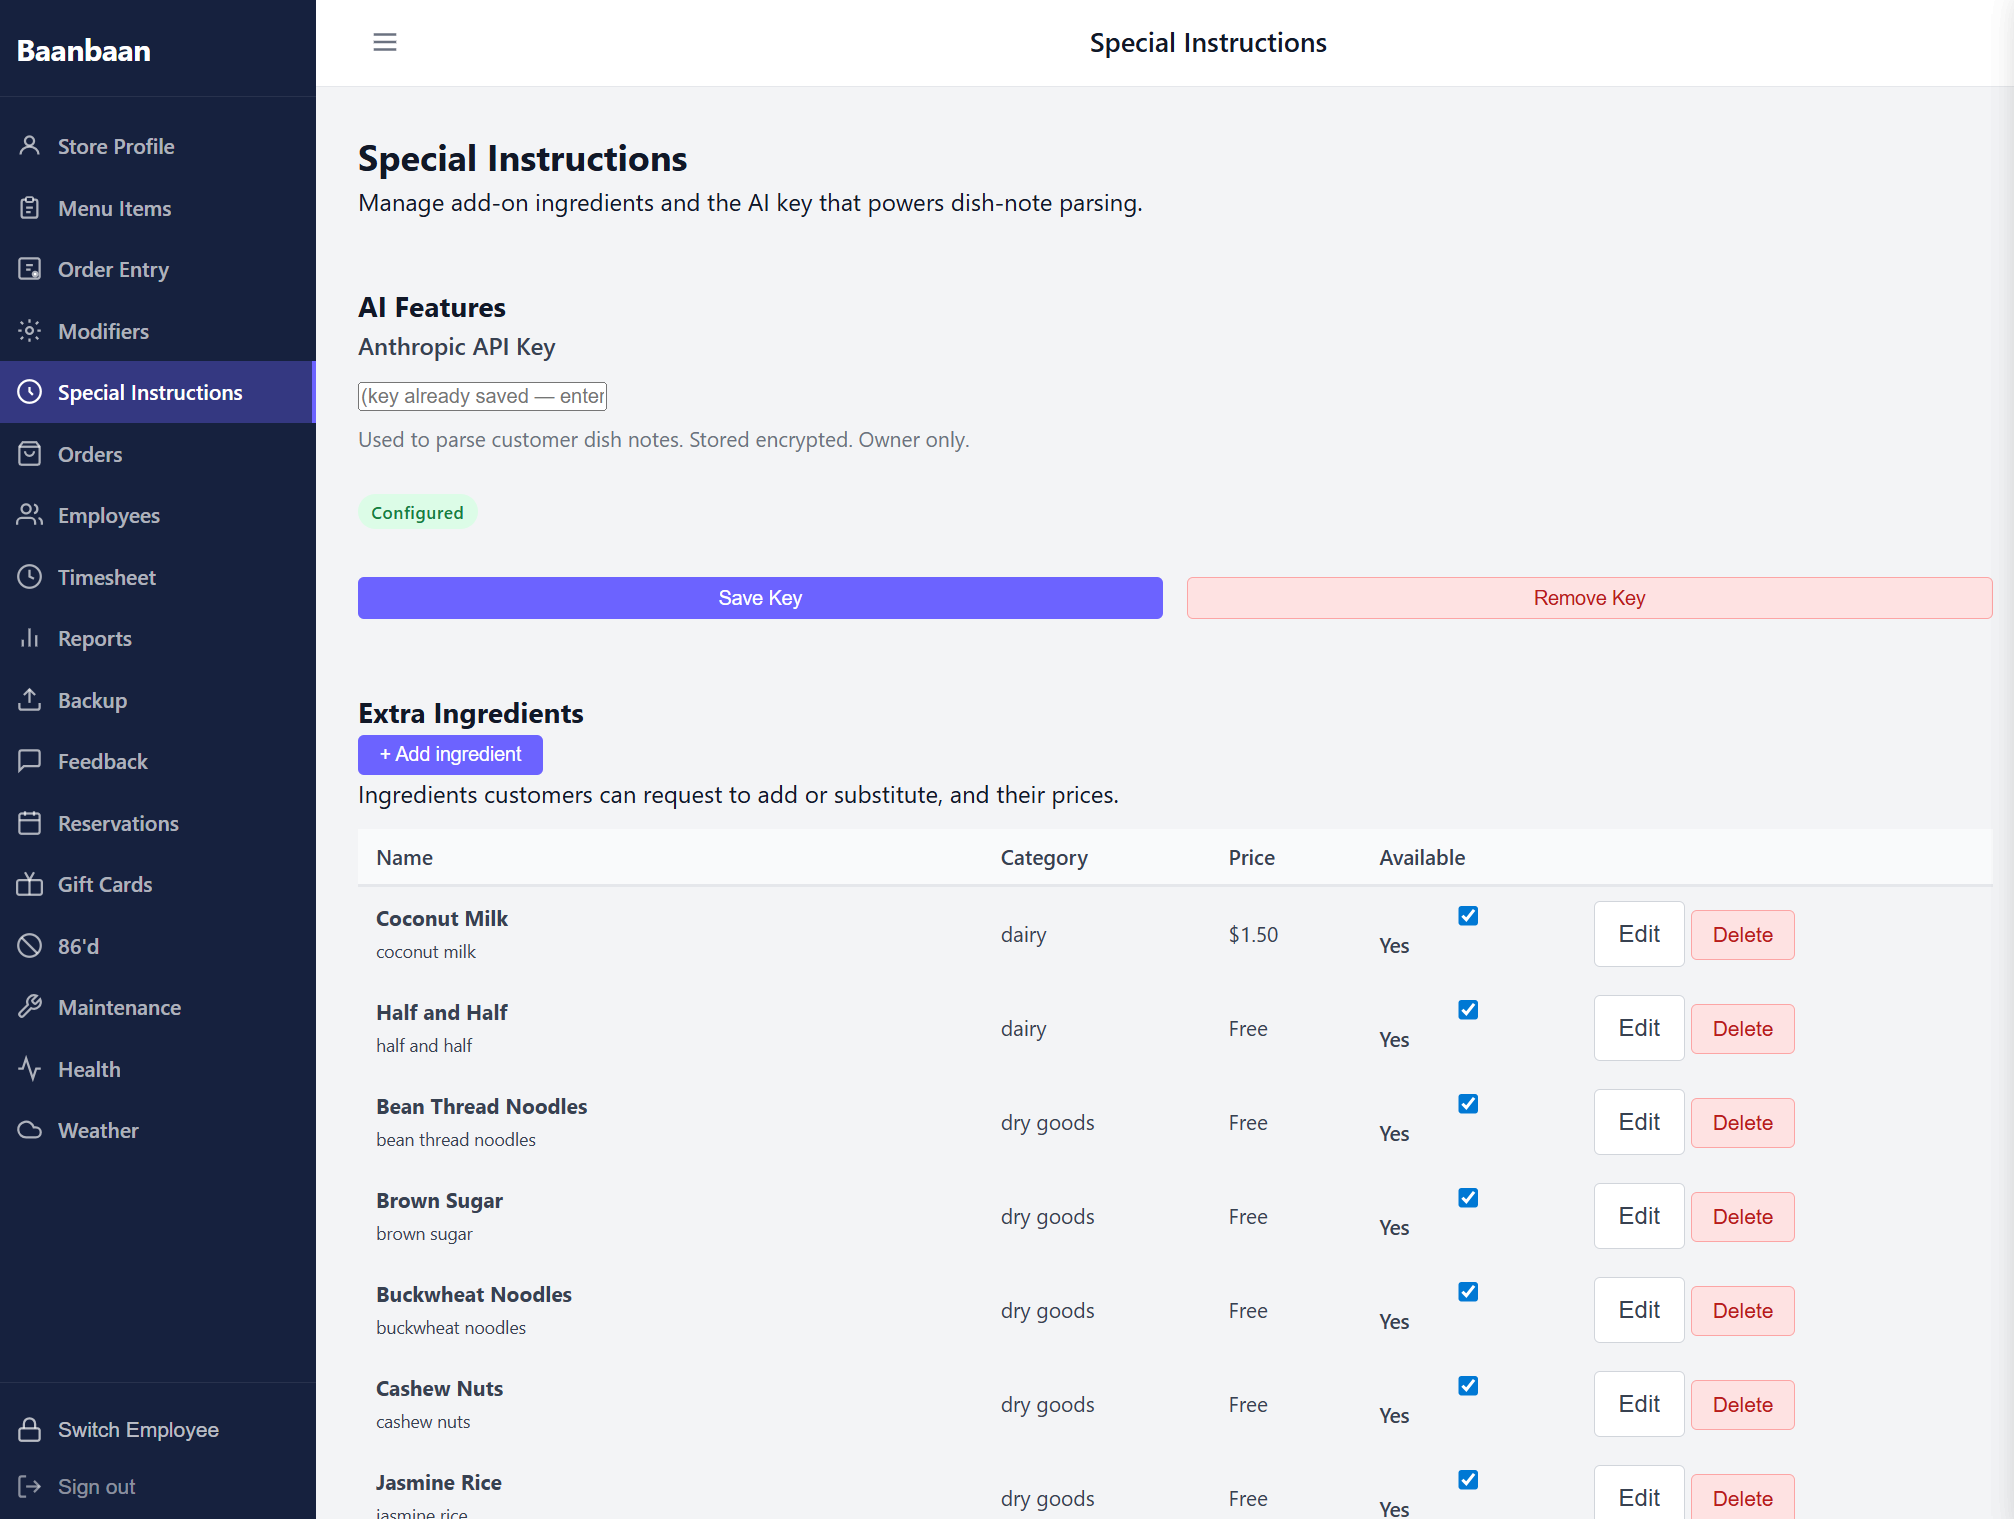
6.1 AI Features
A single field for your Anthropic API key. The key is stored encrypted (only the owner can see or change it), and it is what powers the dish-note parser that turns natural-language customer requests into structured modifier selections and surcharges. The Save Key and Remove Key buttons let you rotate it. A green Configured chip appears once a valid key is on file.
If you don't have a key, the field accepts an empty value and the AI parsing simply falls back to a static rule set.
6.2 Extra Ingredients
A table of add-on ingredients customers can request. Each row has a Name, a Category, a Price (or Free), and an Available checkbox. Use + Add ingredient to extend the list. These rows are what the parser reaches for when a customer asks for "extra peanuts" — it adds a $0.50 line for the peanut row if that's what you've set, or it surfaces an "out of stock" message if you've unchecked the row.
The categories are useful when training the parser to recognise what kind of substitution it is (dairy, dry goods, sauce, etc.). The Edit and Delete buttons on each row let you adjust prices over time.
7. Orders
The Orders screen is the historical ledger plus the live operations queue. The toolbar across the top has date-range presets (Today, Yesterday, Last 7 days) and a from / to picker; a + New Manual Order button on the right lets you create an order that didn't come through the regular flow (catering quotes, a charity comp, etc.).
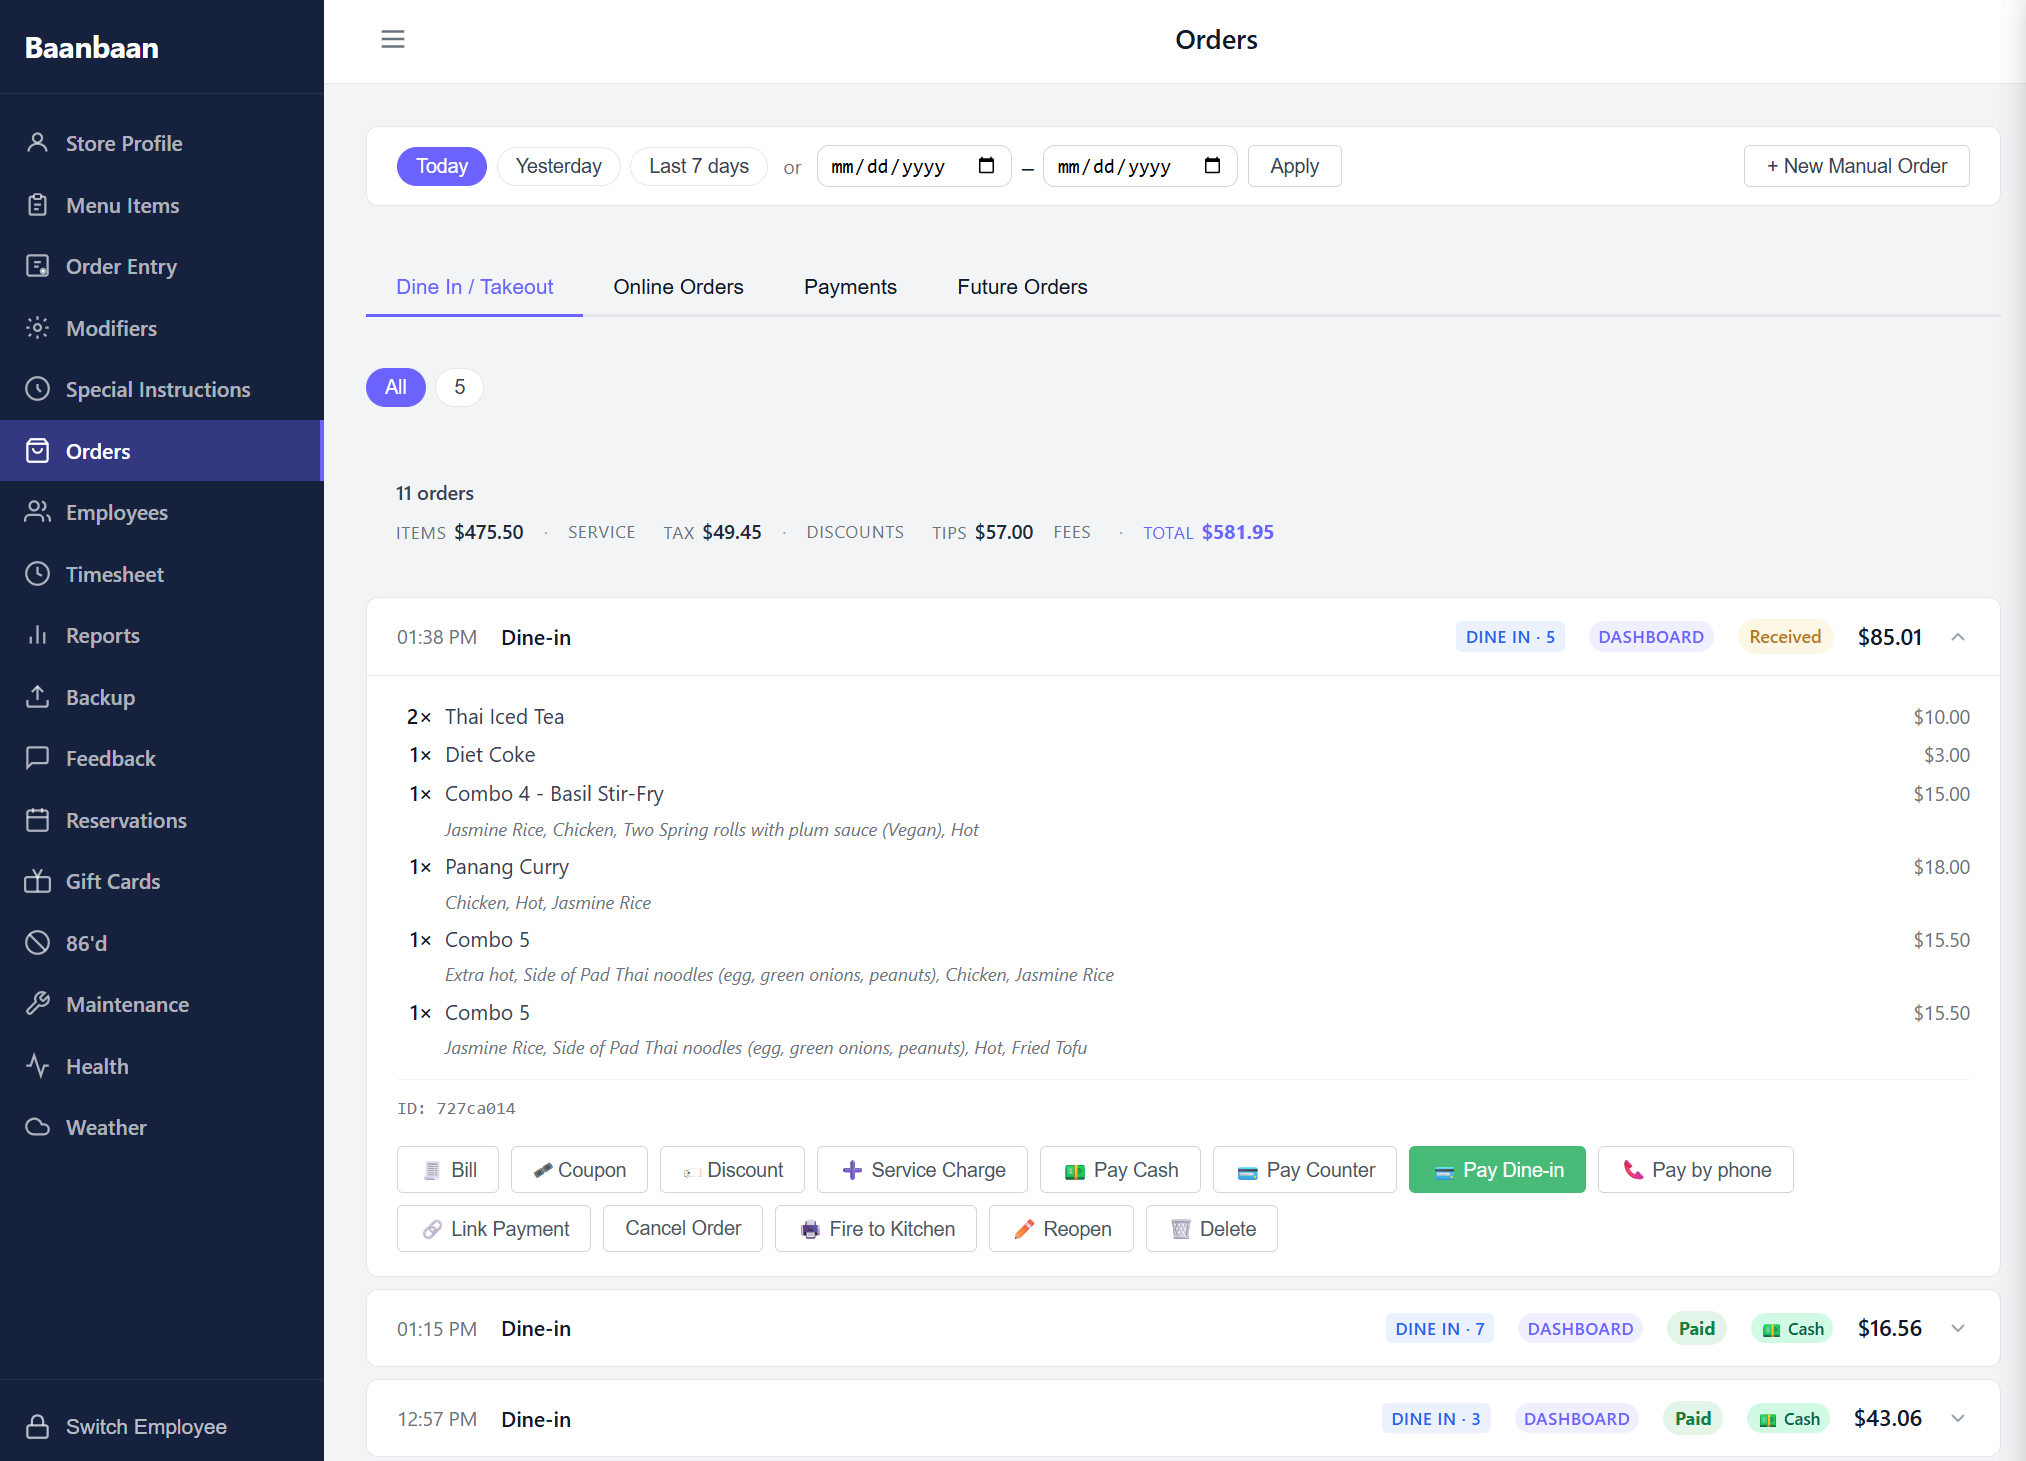
Below the toolbar are four tabs:
- Dine In / Takeout — every in-house and pickup order placed via the POS, with filters by table number.
- Online Orders — orders that came through the customer-facing website; the tab shows a numeric badge for any orders that need attention.
- Payments — the payment-side view of everything (paid, partial, refunded, voided) with a Terminal Status button for diagnosing the card readers.
- Future Orders — advance / catering orders scheduled for later dates, with a + New Order button.
Below the tabs is an "All / 5" filter bar (number = order count) and a financial summary line — Items, Service, Tax, Discounts, Tips, Fees, Total — visible only to managers and owners.
Each order card expands inline to show its line items and a row of actions: Bill (reprint the customer receipt), Coupon, Discount, Service Charge, Pay Cash, Pay Counter, Pay Dine-in, Pay by phone, Link Payment (associate a card payment that was taken on a separate terminal), Cancel Order, Fire to Kitchen, Reopen (for closed orders), and Delete. Paid orders also show the receipt source — DASHBOARD, Received / Paid, the payment method, and the total in the corner.
8. Employees
A list of every staff member with their initials avatar, name, and role badge (CHEF, MANAGER, SERVER). Each row has Edit and Delete buttons.
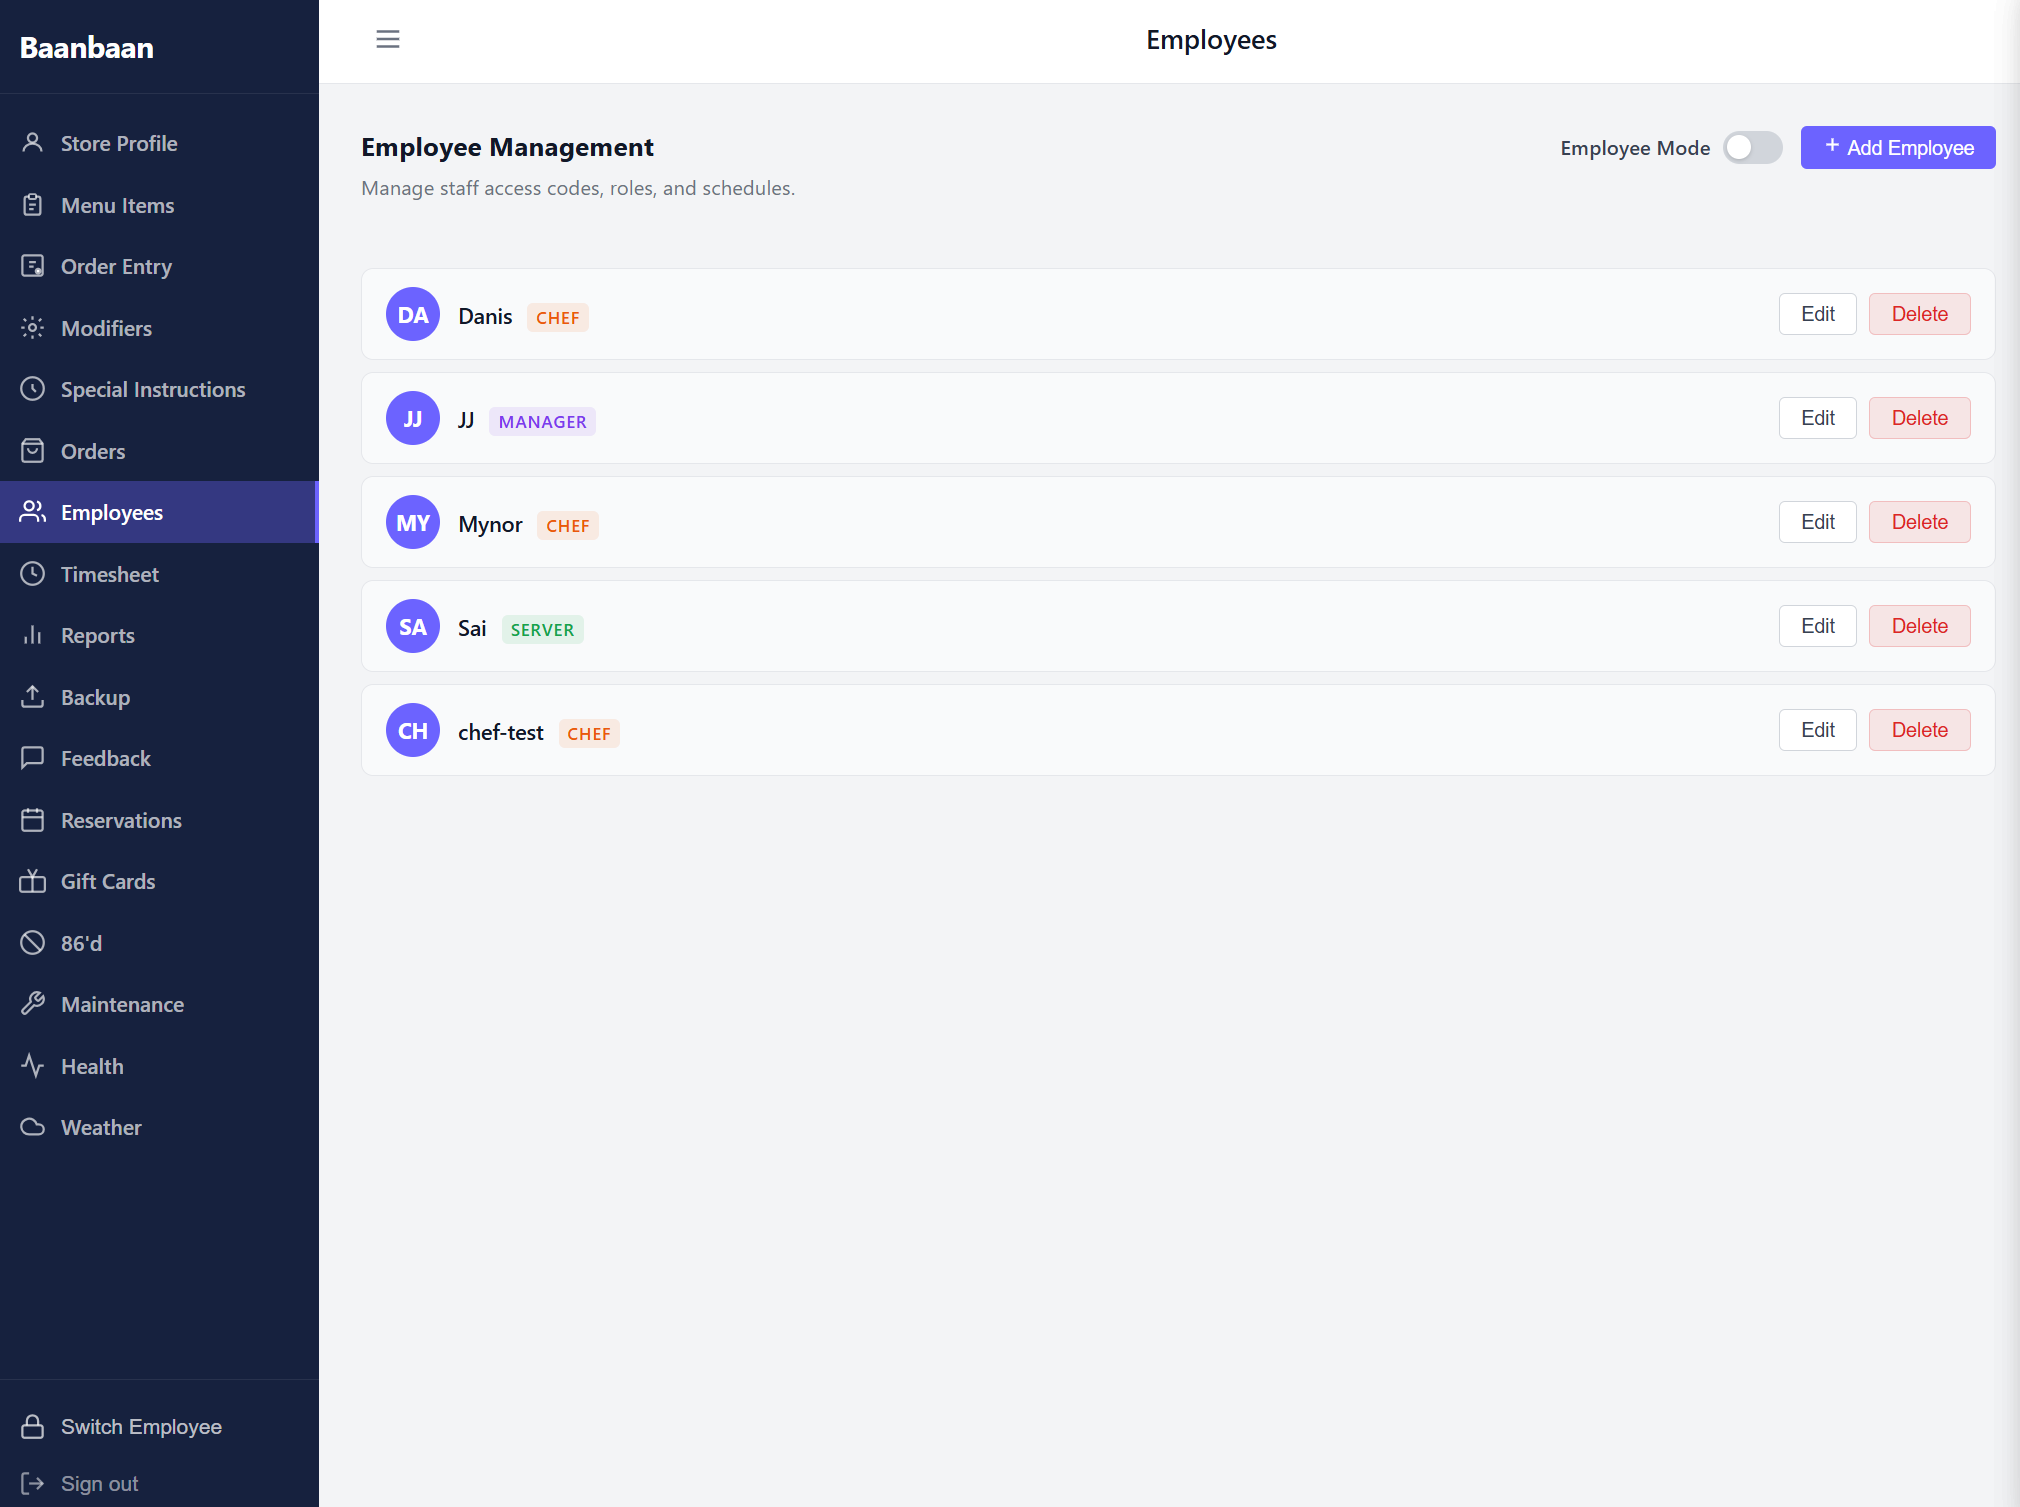
The header has two controls:
- Employee Mode toggle — when on, the dashboard locks behind a PIN keypad and every action is attributed to whoever is currently clocked in.
- + Add Employee — opens a form for adding a new staff member with their name, a 4-digit PIN, and a role (server, chef, manager). Managers and owners can clock employees in and out manually; everyone else uses the keypad and the Switch Employee sidebar button.
Deleting an employee never deletes their historical shifts or tips — the row simply marks them inactive so they no longer appear on the keypad.
9. Timesheet
The clock-in / clock-out log. A date range filter at the top lets you pick the window; the table below has one row per shift with the employee, role, date, clock-in time, clock-out time, and total hours. An open shift shows the words Active in the Clock Out column and In progress in Hours.
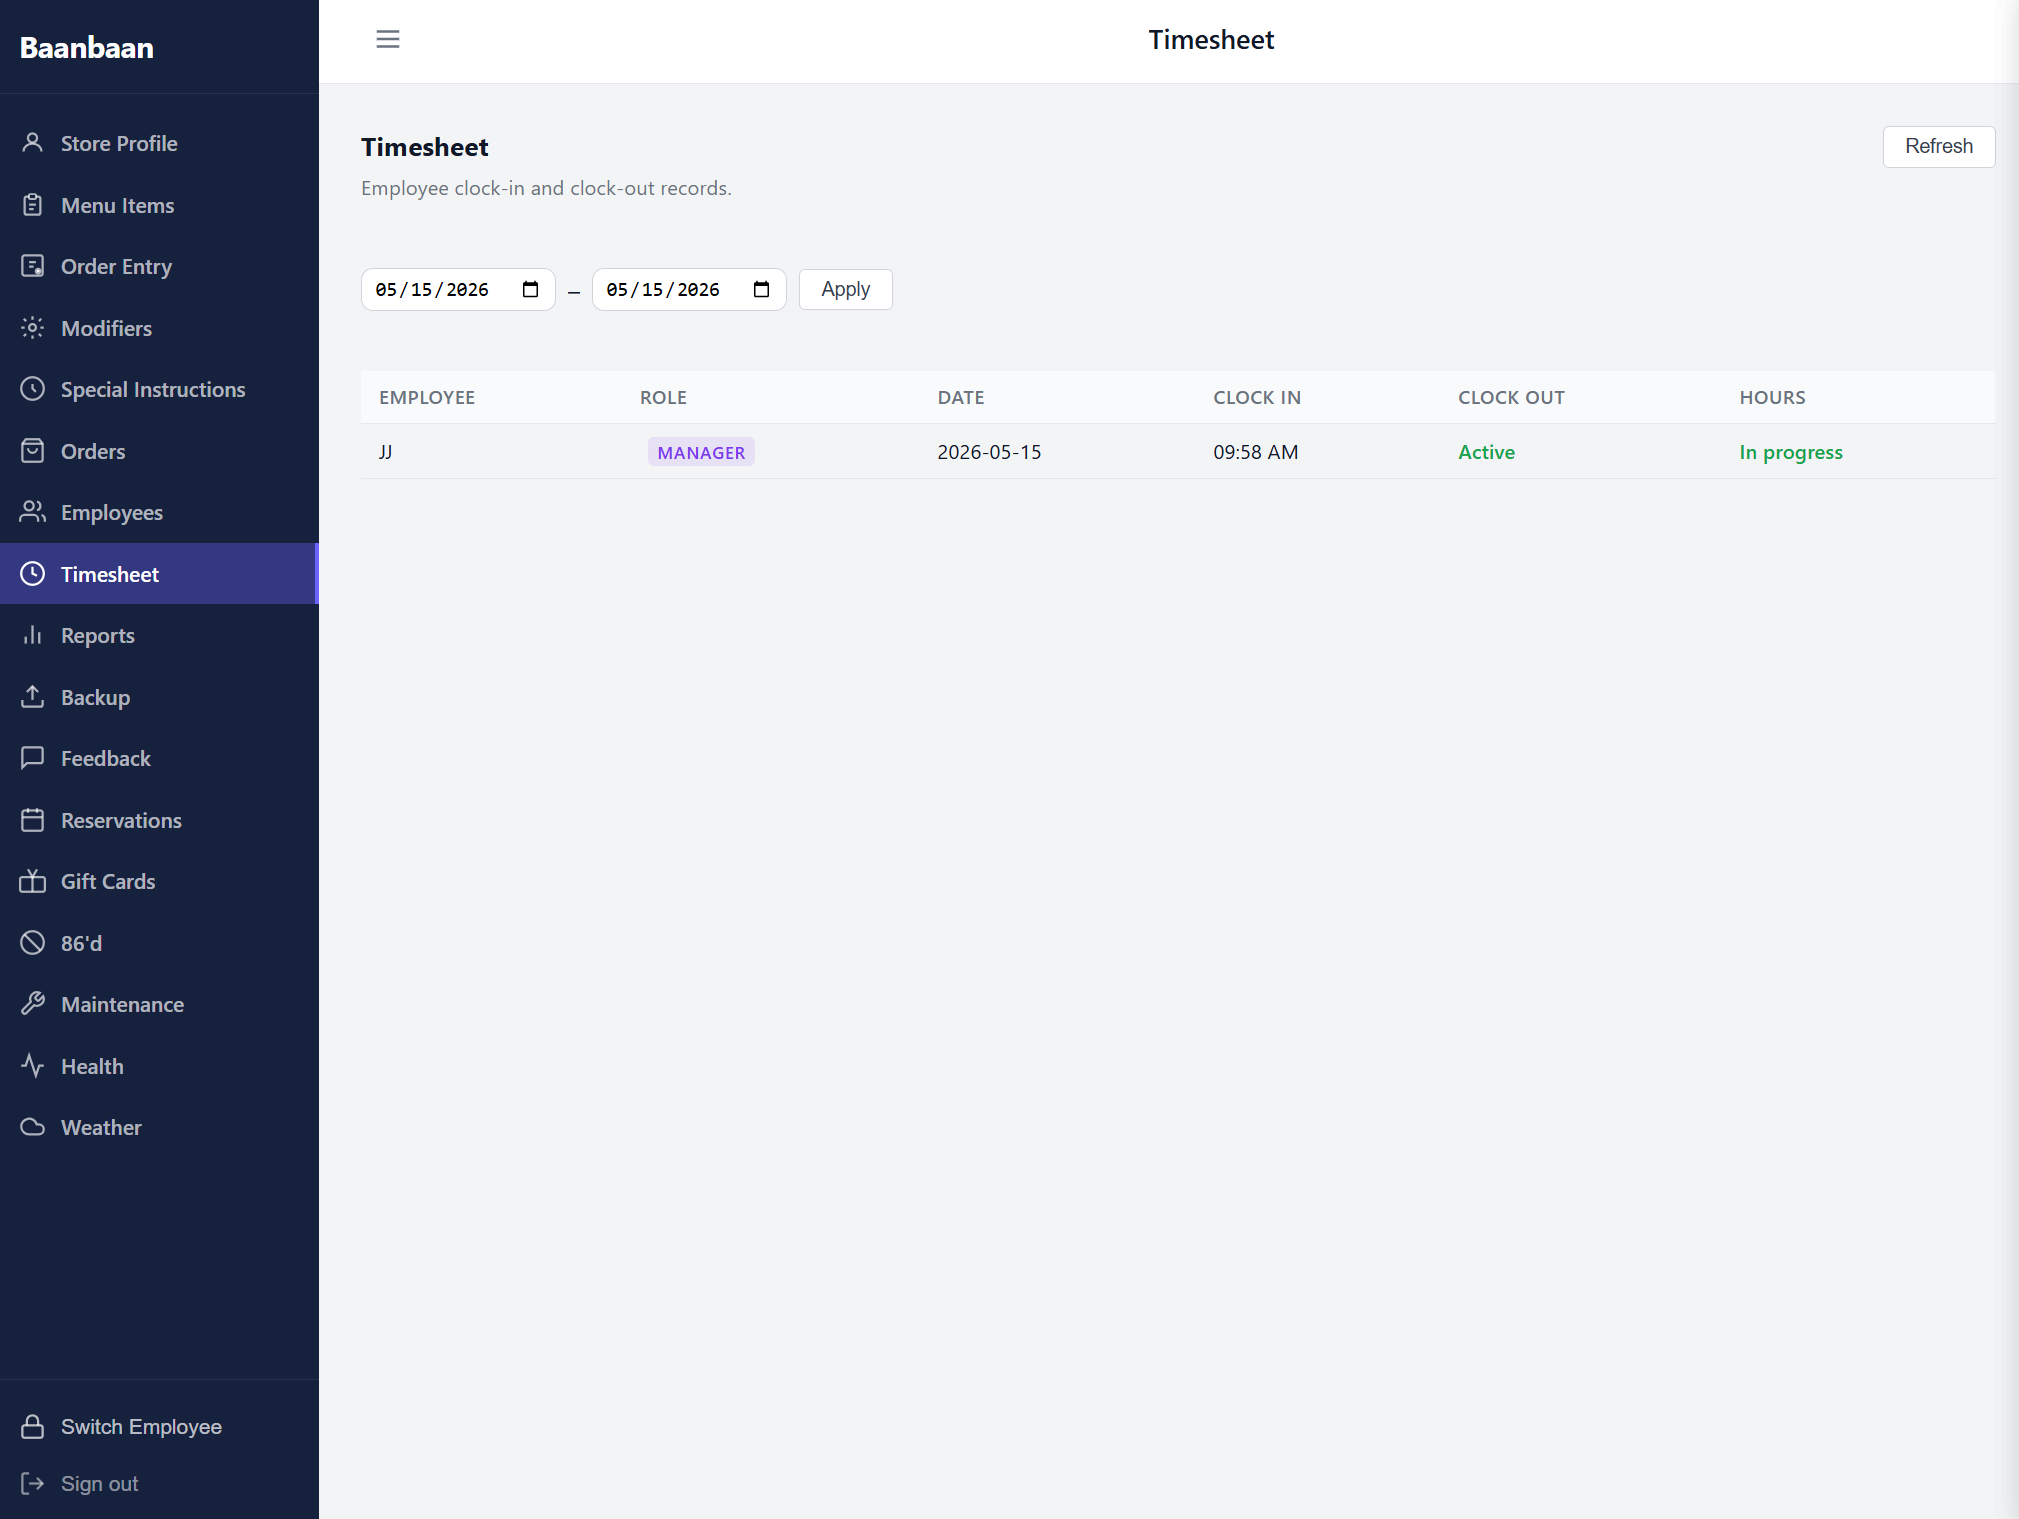
The Refresh button in the corner re-fetches the latest punches — useful on a Friday afternoon when staff are clocking in and out and you want the screen to keep up.
Managers and owners can edit any shift (fix a forgotten clock-out, adjust a misplaced punch) by clicking it; the edit is logged for audit.
10. Reports
Sales, shifts, and tip summaries on four sub-tabs.

A row of preset buttons across the top — Today, Yesterday, This month, Last month, Last 30 days, This pay period, Last pay period — plus a custom from / to picker drives the date range for all four panels.
- Sales — paid orders in the period, with subtotal, tax, tips, discounts, fees, and net.
- Shifts — per-employee hours, total hours, and the count of shifts. The break-rule card shows the policy in effect (
>10h → −60minis the default California-style auto-deduct, but it's configured per-restaurant). - Tips — total tips and average per order, broken down by server.
- Partial Payments — orders where a customer started but did not finish a split payment. At end-of-day you can write off the unpaid balance from this tab as a discount to close the ticket.
The Shifts table is clickable: tapping a row opens a modal with that employee's individual shifts for the selected period.
11. Backup
Local-first backup and restore for the entire merchant database.
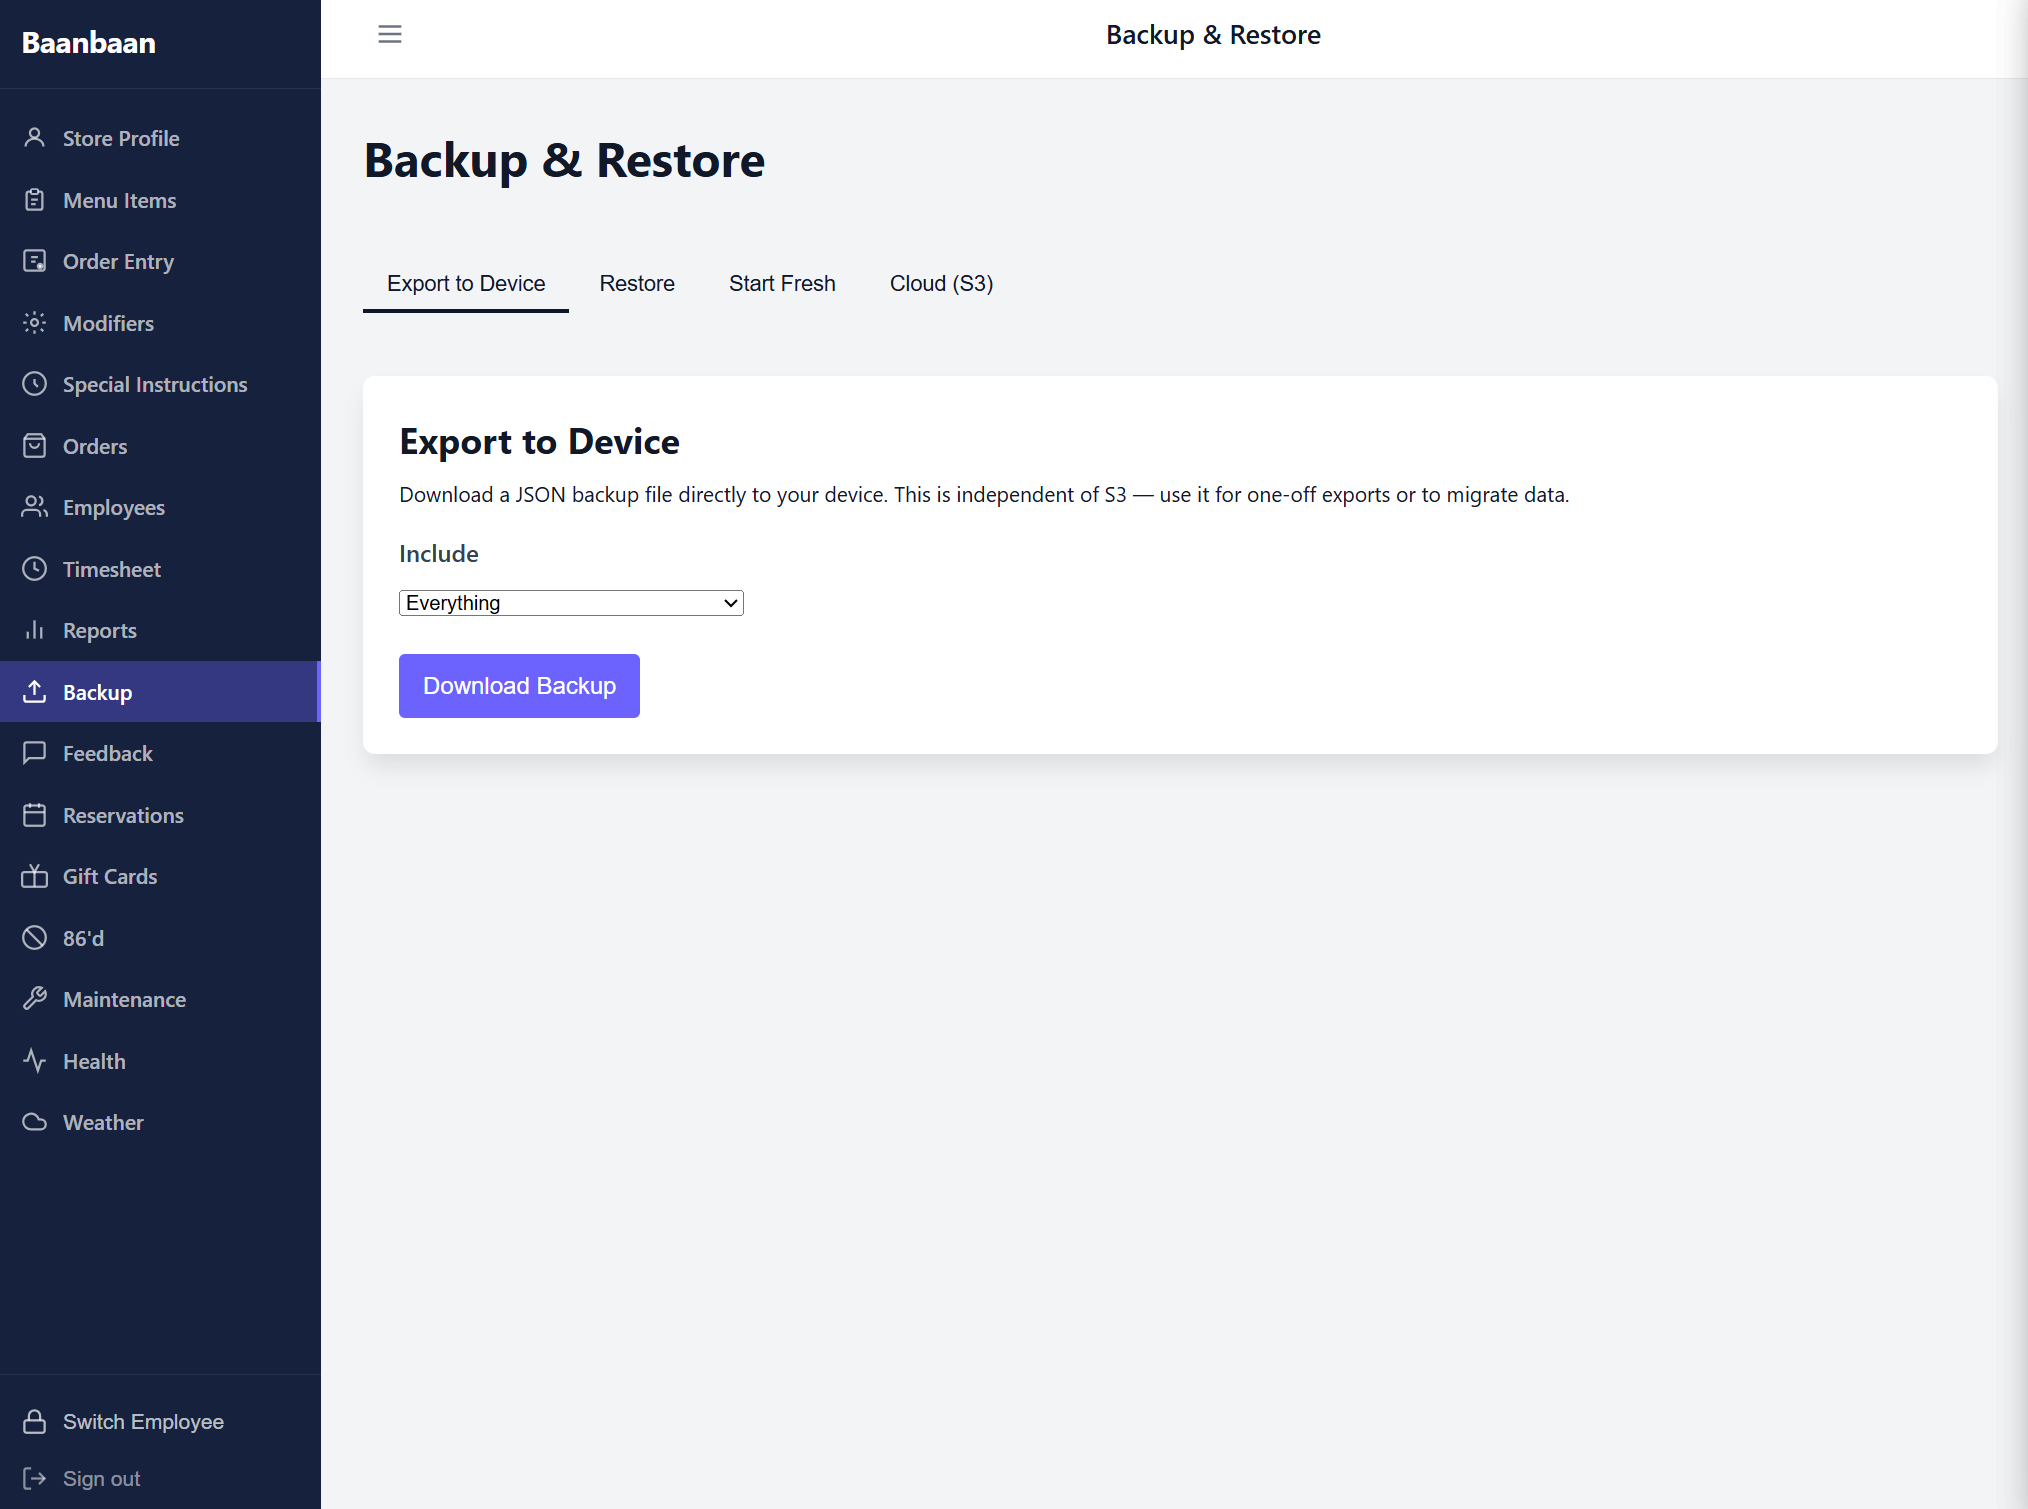
Four tabs:
- Export to Device — downloads a single JSON file containing everything (or just menu, orders, employees & shifts, or store profile, depending on what you pick from the "Include" dropdown). Use this for one-off snapshots and for migrating to a new appliance. A date filter appears when you choose Orders or Employees so you can scope the export.
- Restore — uploads a previously-exported JSON file and merges it back in.
- Start Fresh — wipes the database after a typed confirmation, for setting up a demo or rebuilding from scratch. Use sparingly.
- Cloud (S3) — optional automated nightly backups to your own S3 bucket. You fill in the bucket name, region, and access keys once; the appliance does the rest. The same tab shows the last backup time and lets you trigger one on demand.
12. Feedback
The customer review viewer.
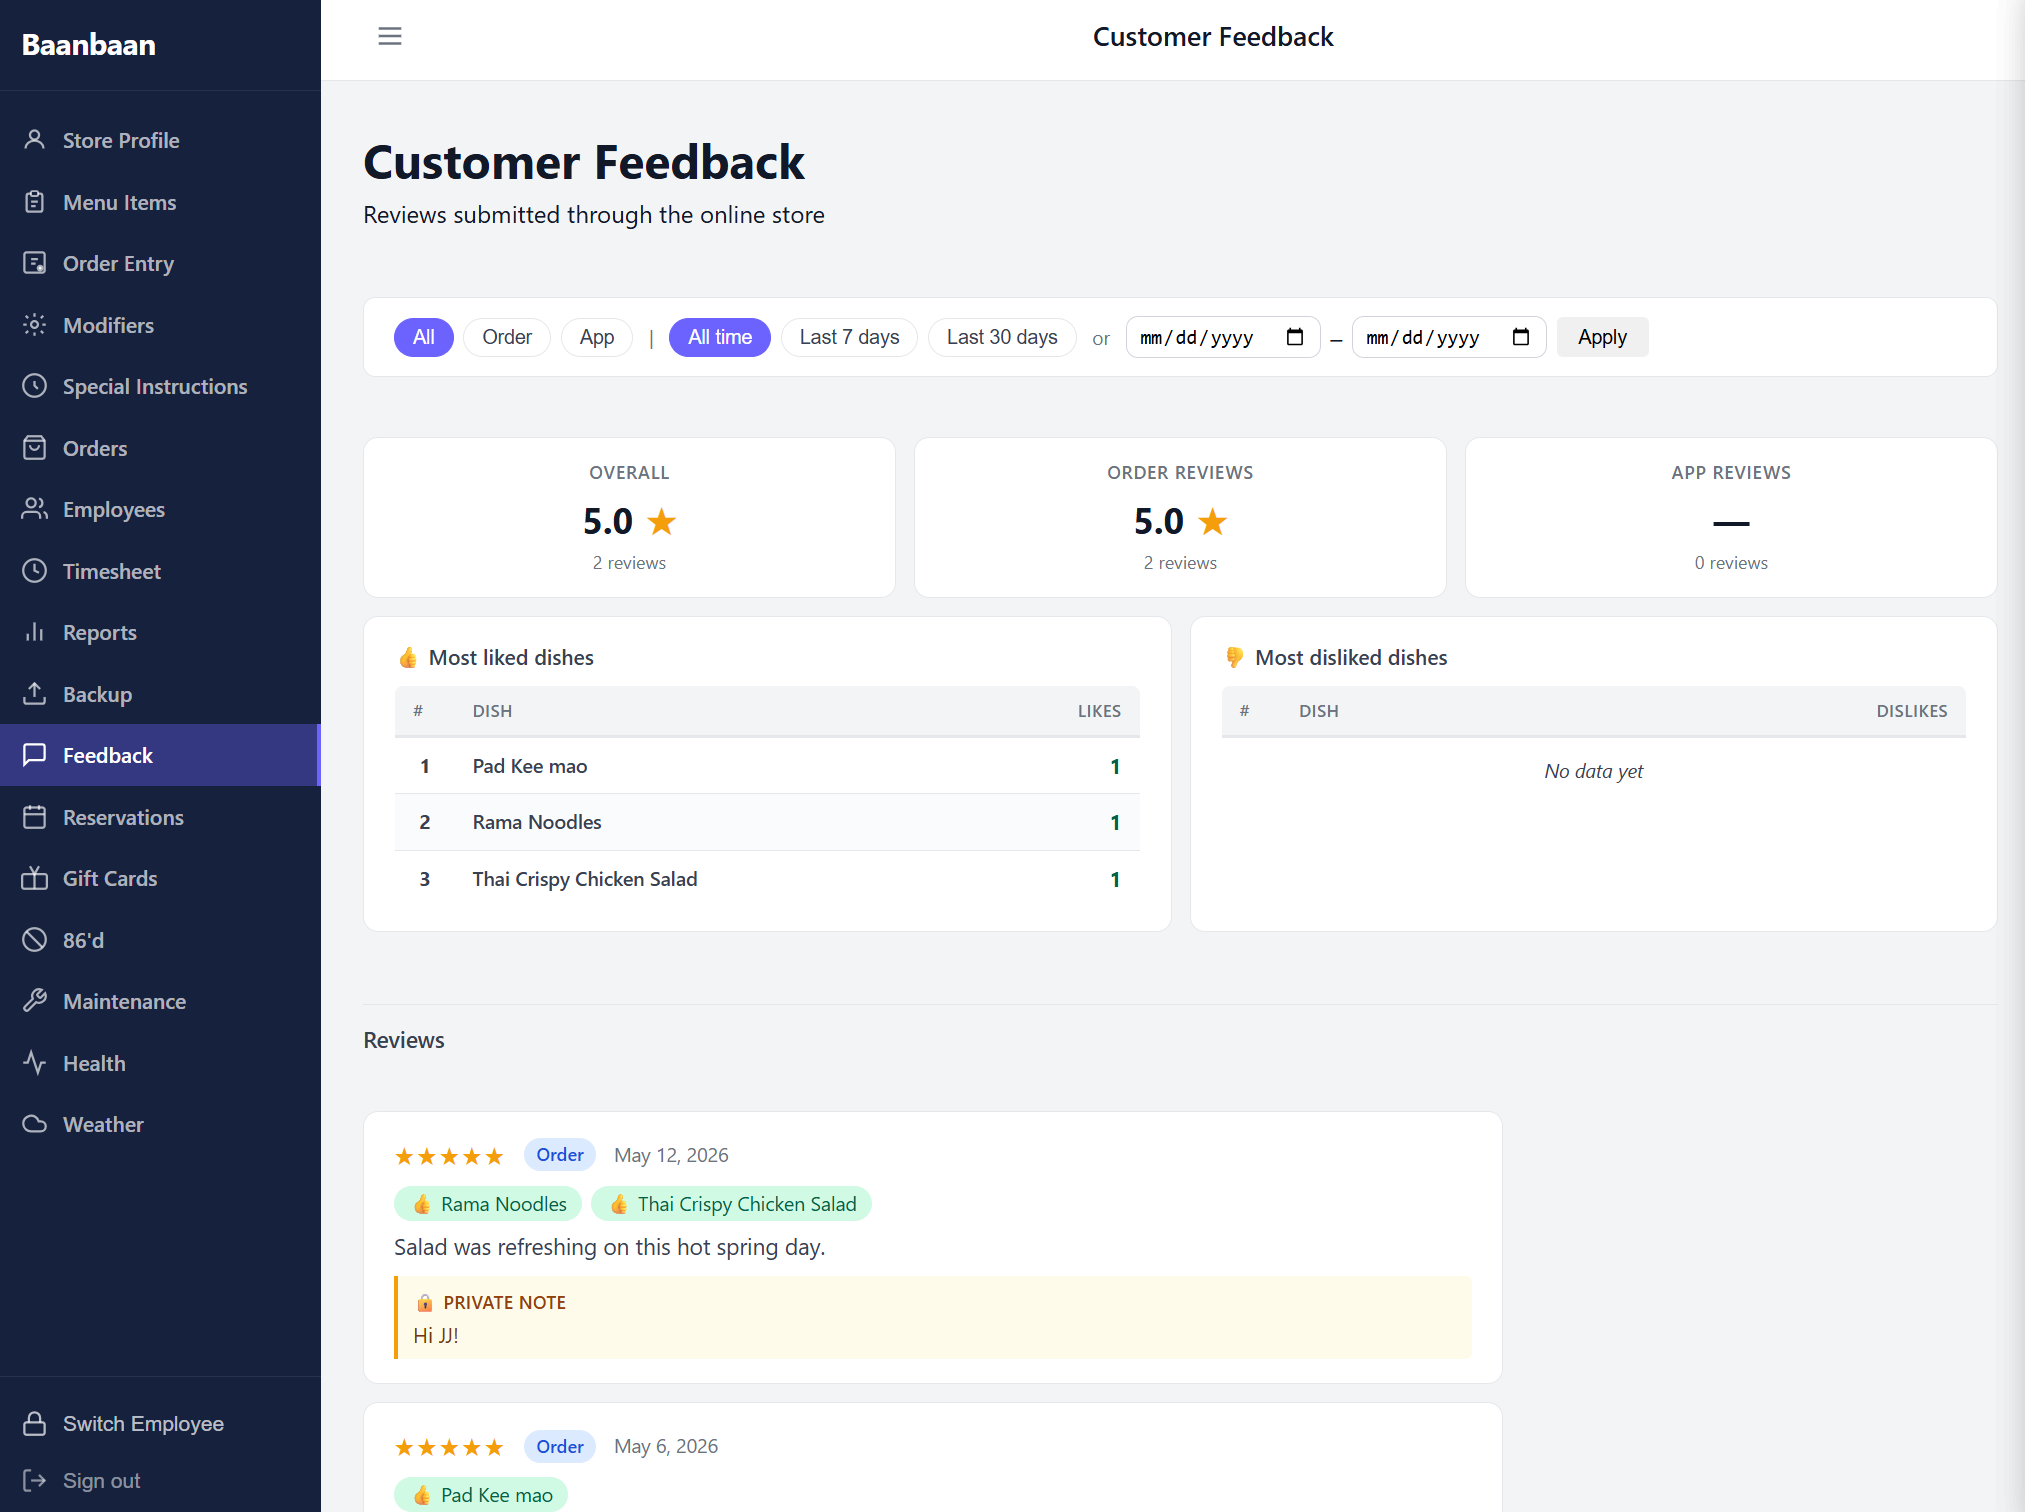
Three filter pills along the top — Order, App, All time (with extra date-range presets and a custom picker) — narrow the view. The three summary cards show overall rating, order-level rating, and app-level rating, each with a count of reviews and an average score.
Below the cards, two parallel tables surface the dishes that are getting the most love and the most complaints — 👍 Most liked dishes and 👎 Most disliked dishes — so you can spot a kitchen problem quickly. Underneath is the full reviews list, newest first, each entry showing the rating, the order type, the date, the dishes ordered (as tags), the review text, and any private staff note that has been attached. You can pin or reply to entries from the row itself.
13. Reservations
A single day-at-a-time view of your booking calendar.
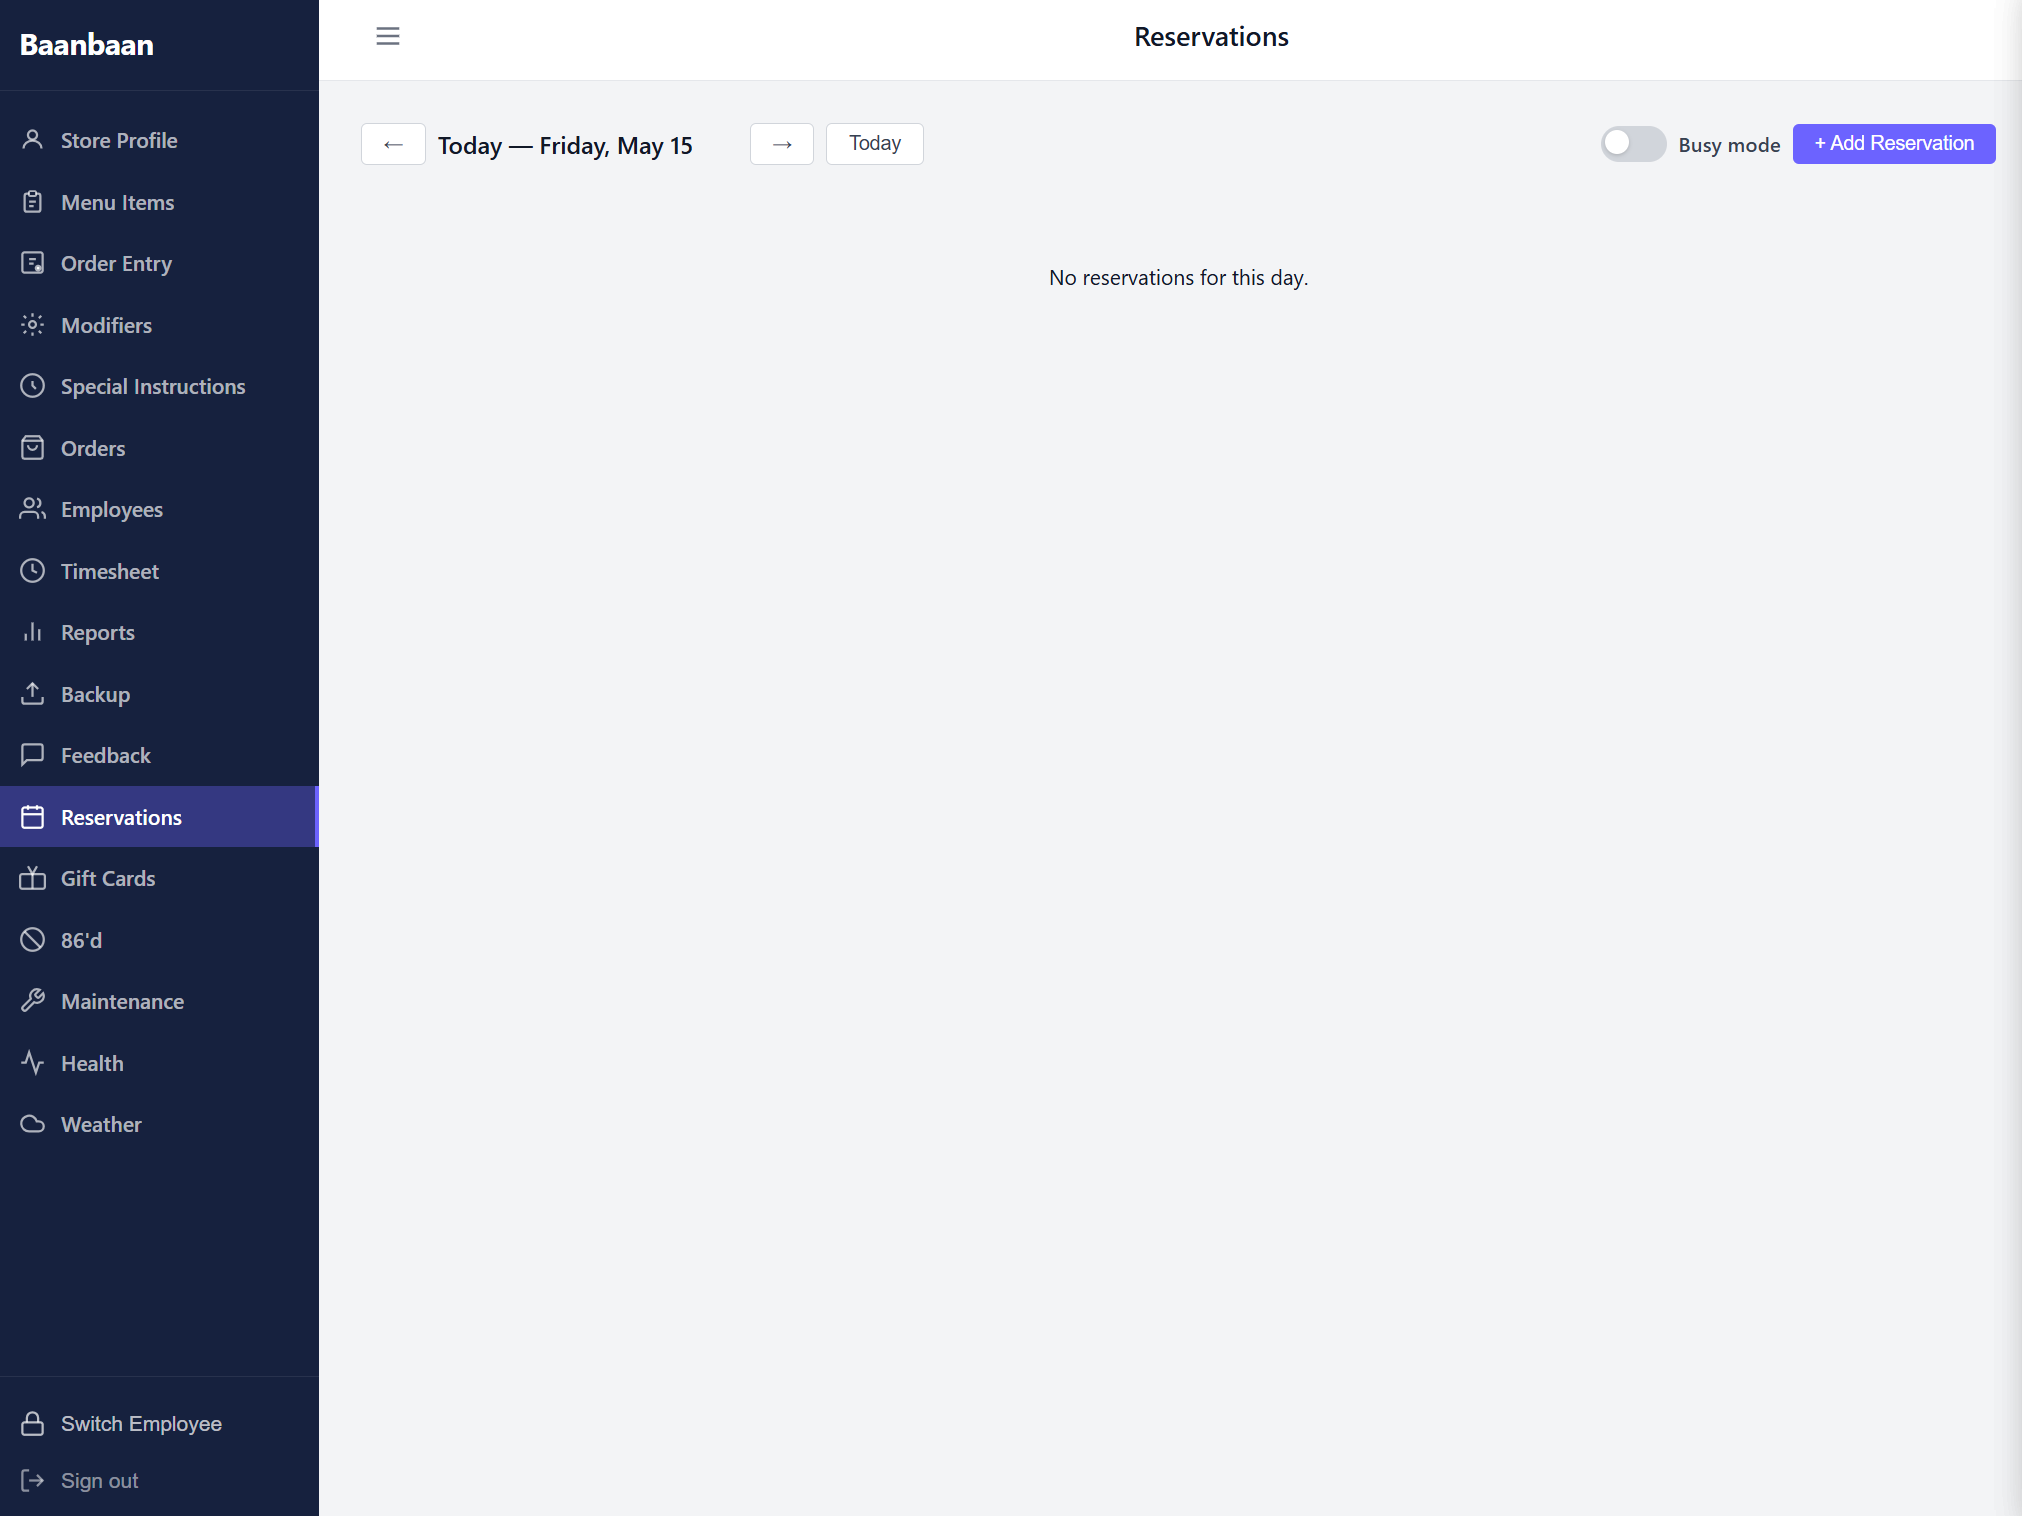
The header has back / forward arrows to step through days, a Today button, a Busy mode toggle, and + Add Reservation. The list below shows every reservation for the selected day with the party size, name, time, and any notes.
Busy mode is the one that's worth highlighting: flip it on and the customer-facing reservation site stops accepting new bookings for the next 1 / 2 / 3 / 4 hours or the rest of the day. A red banner appears in the dashboard while it's on, with an "Apply" / "Turn off" pair so a host can react to a sudden rush without leaving their station.
14. Gift Cards
A complete view of every gift card the restaurant has issued.
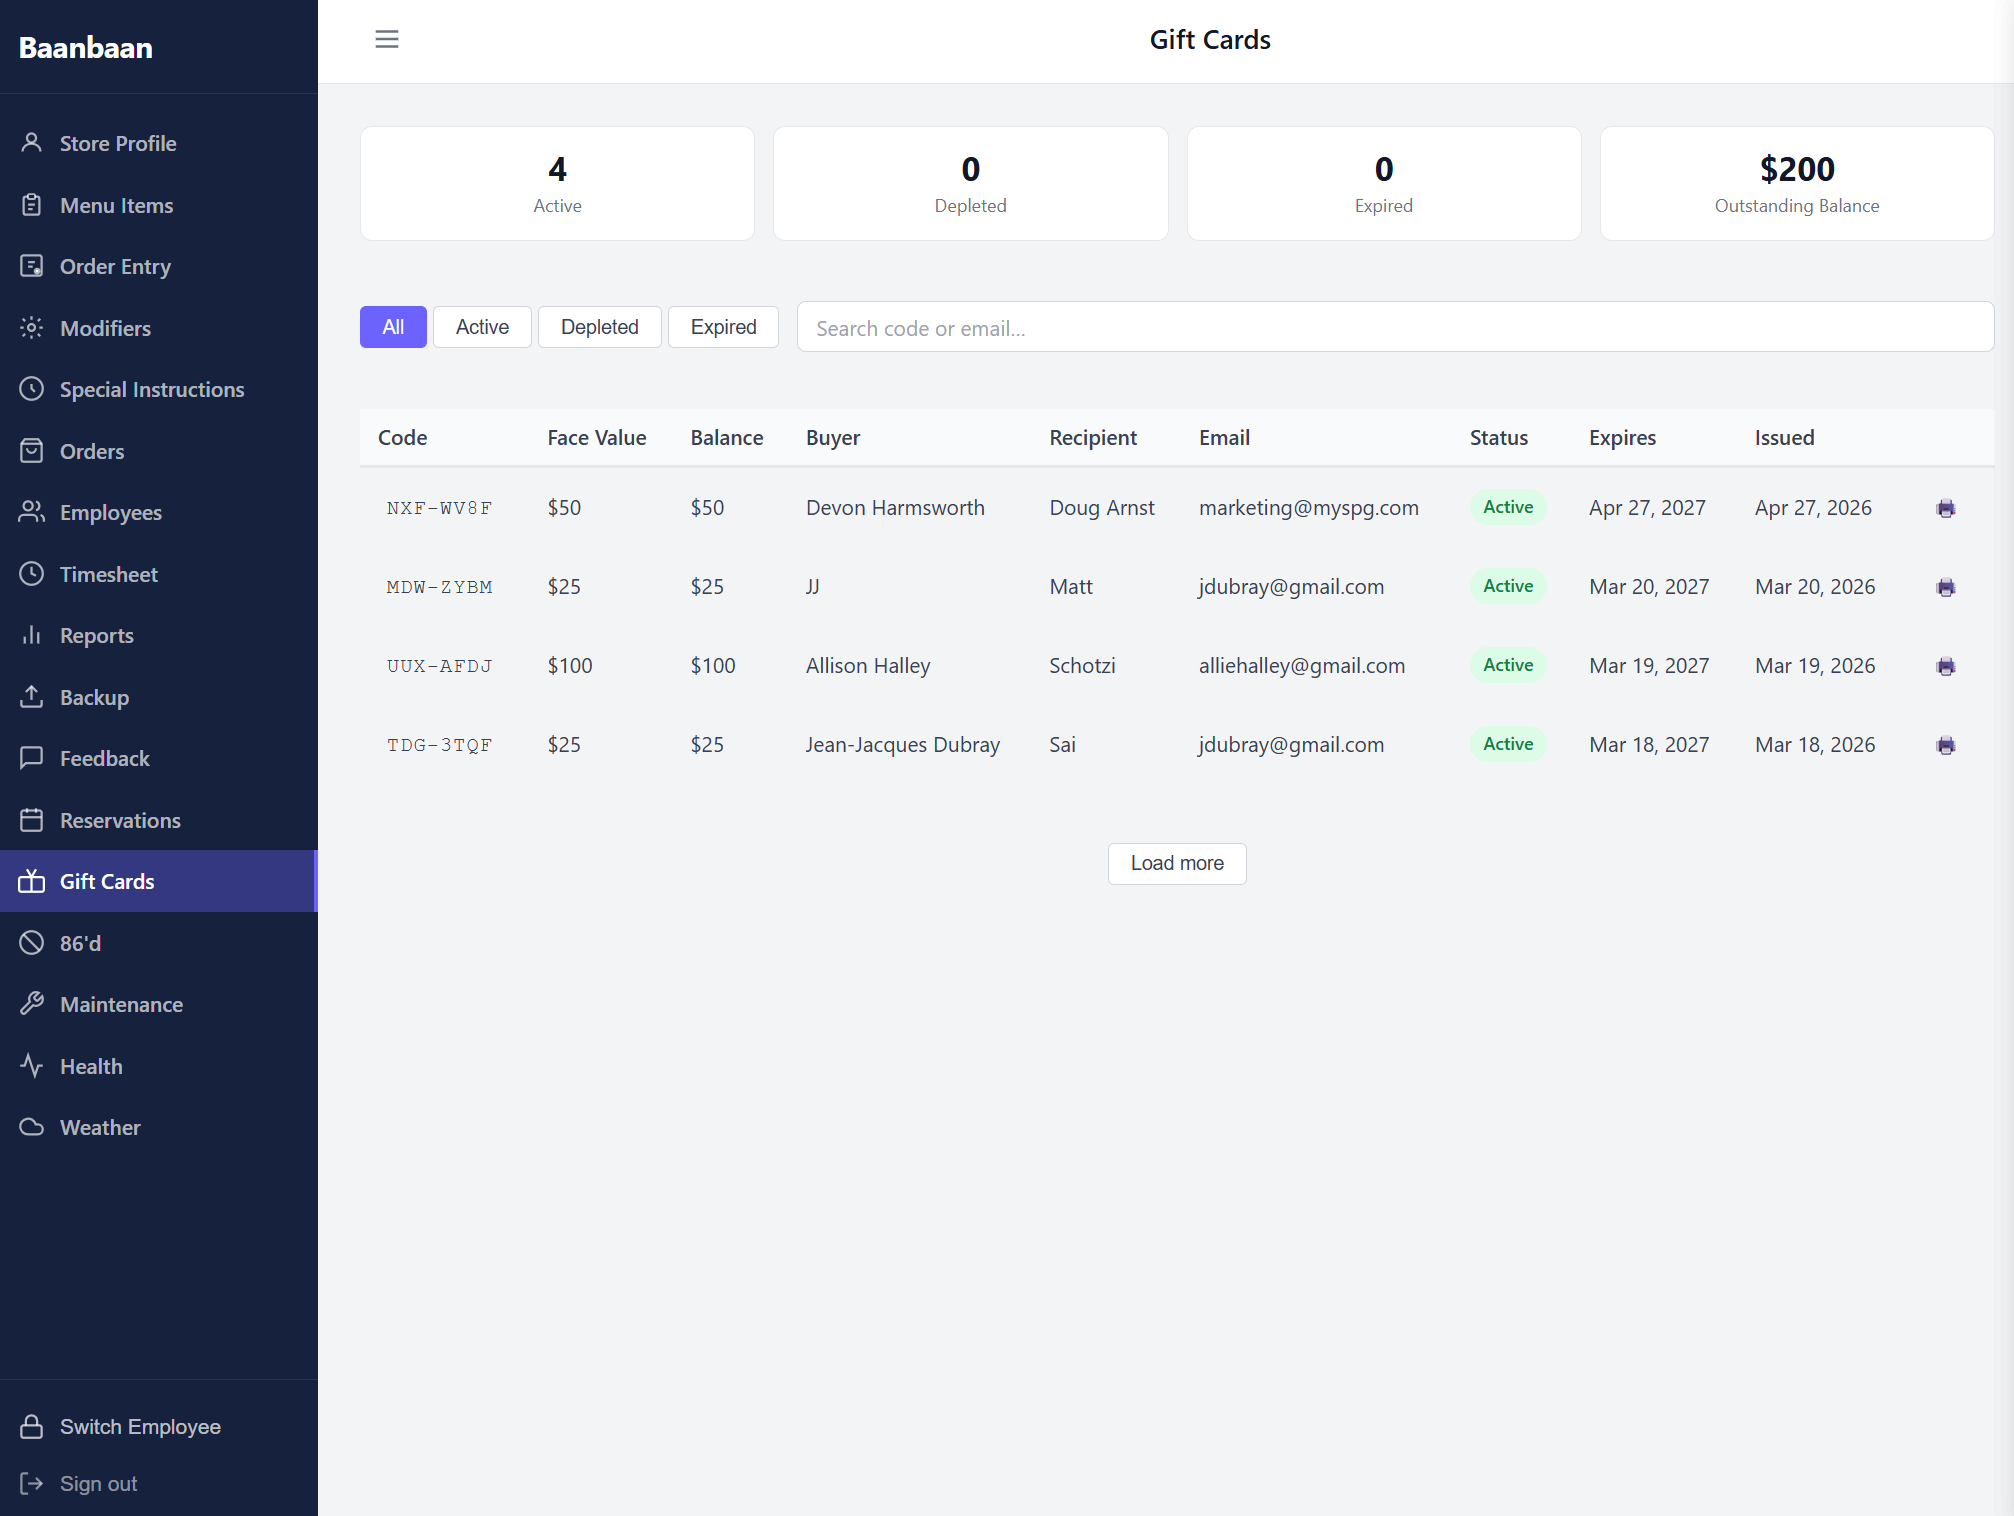
A four-card stats strip across the top shows the count of Active, Depleted, and Expired cards plus the total Outstanding Balance — the dollar amount of cards still on the books that customers can still spend. The filter chips below the strip let you scope the table to one of those four statuses, and the search box accepts either a code or a buyer's email.
The table itself lists each card with its code (monospace), face value, remaining balance, buyer name, recipient name, recipient email, status, expiry date, and issue date. A small printer icon at the end of each row reprints the original gift-card slip; Load more at the bottom pages older cards in.
15. 86'd — Out of stock
The 86'd screen is the kitchen's "what's out right now" panel.
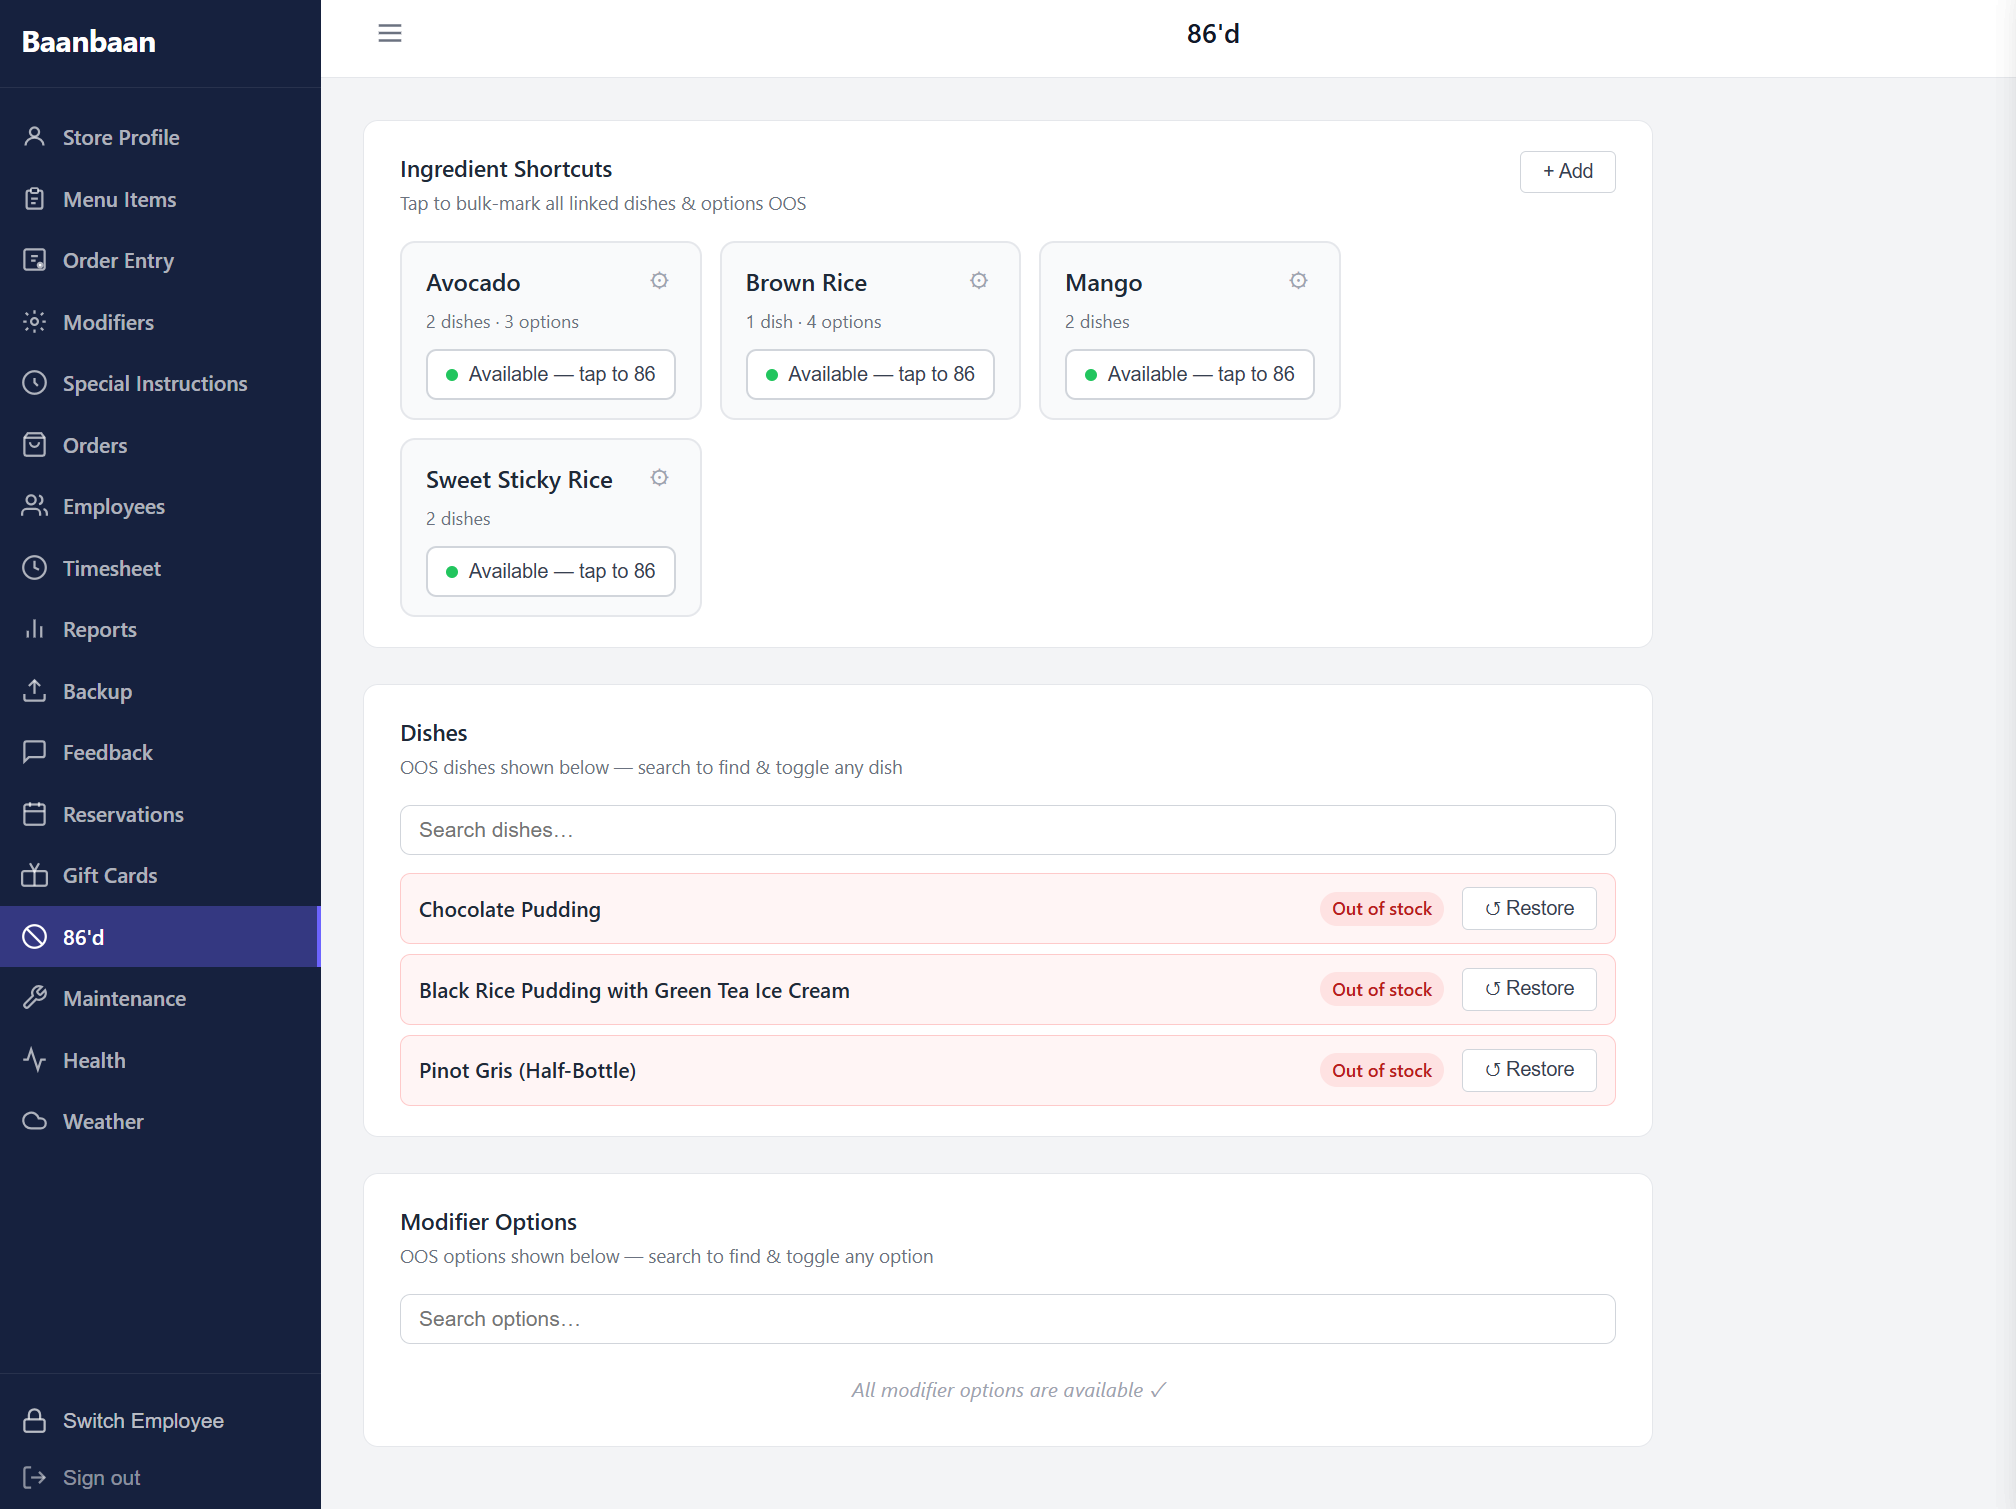
Three stacked cards:
- Ingredient Shortcuts — one tile per master ingredient (Avocado, Brown Rice, Mango, Sweet Sticky Rice in the screenshot above). Each tile counts how many dishes and modifier options reference that ingredient and exposes a single big Available — tap to 86 button. Tap it and every linked dish and every linked modifier option goes out of stock at once; tap it again to bring them all back. The + Add button lets a manager create a new ingredient shortcut and link it to whatever dishes and options it appears in.
- Dishes — every dish currently 86'd, with a Restore button next to each, and a search box so you can find any dish and toggle it individually. The badge
Out of stockappears on dishes that are explicitly 86'd as opposed to those that are out because an ingredient is. - Modifier Options — same idea as dishes but for the modifier options (Chocolate Pudding, Pinot Gris (Half-Bottle), etc.).
Both panels show counts in the heading and refresh live; voice commands fired from the Menu Items screen also flow into this screen automatically.
16. Maintenance
Compliance logging for the things the city inspects.
The screen has two sub-sections: Grease Trap and Exhaust Hood. Each one has a small form (date, cleaned-by, gallons of grease and solids for the trap; date, company, optional notes for the hood) and a table of past entries. The View City Report ↗ link in the header opens a print-ready version of the cumulative log that you hand to inspectors.
This is the part of the dashboard you'll touch once a month at most, but the records have to be there when the inspector shows up, so logging is one button-press per cleaning.
17. Health
System diagnostics for the merchant appliance.
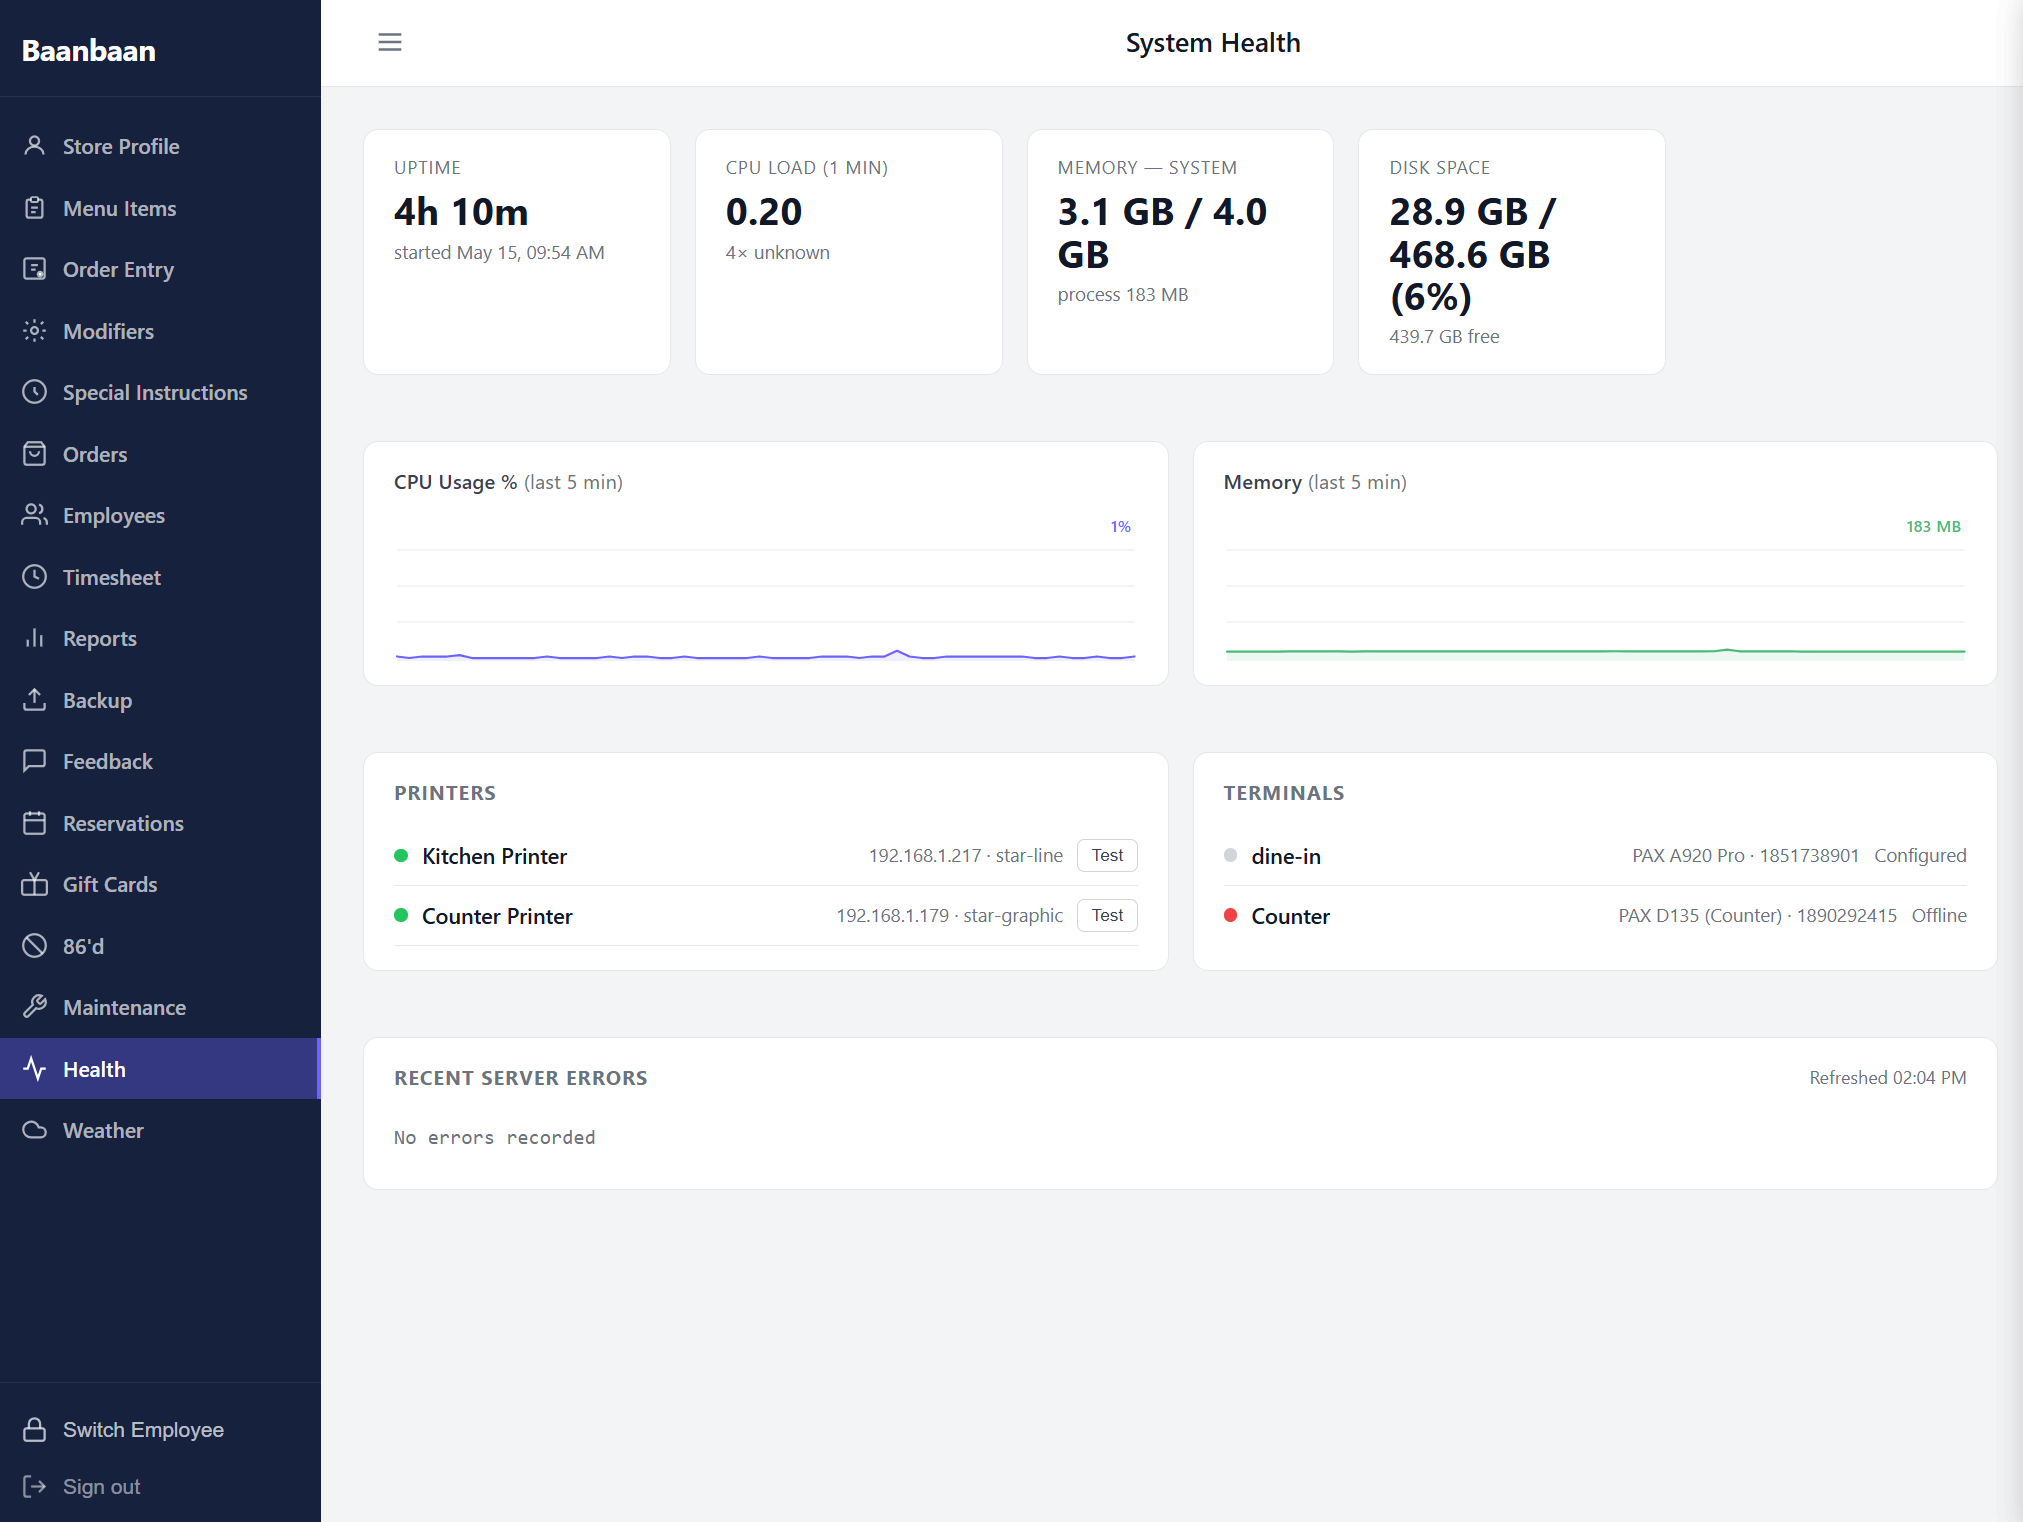
Four metric cards across the top — Uptime (with the date the appliance was last started), CPU Load (1 min), Memory — System (with the process memory underneath), and Disk Space (with free space underneath). Below them, two live charts of CPU usage and memory over the last 5 minutes.
Underneath, two device panels list every Printer (kitchen, counter, etc.) and every Terminal (the card readers) with their last-known status and IP address. Each row has a Test button that fires a test print or pings the terminal so you can verify the device on the wall is reachable from the appliance. A green dot means online and reachable; red means offline; amber means responding but with errors.
At the bottom is Recent Server Errors — the most recent entries from the appliance's error log so you can spot a crash or a misbehaving printer without SSH'ing in.
This screen is the first place you go when something feels off ("orders aren't printing").
18. Weather
A six-day forecast pinned to the restaurant's address (Kirkland, WA in the demo).
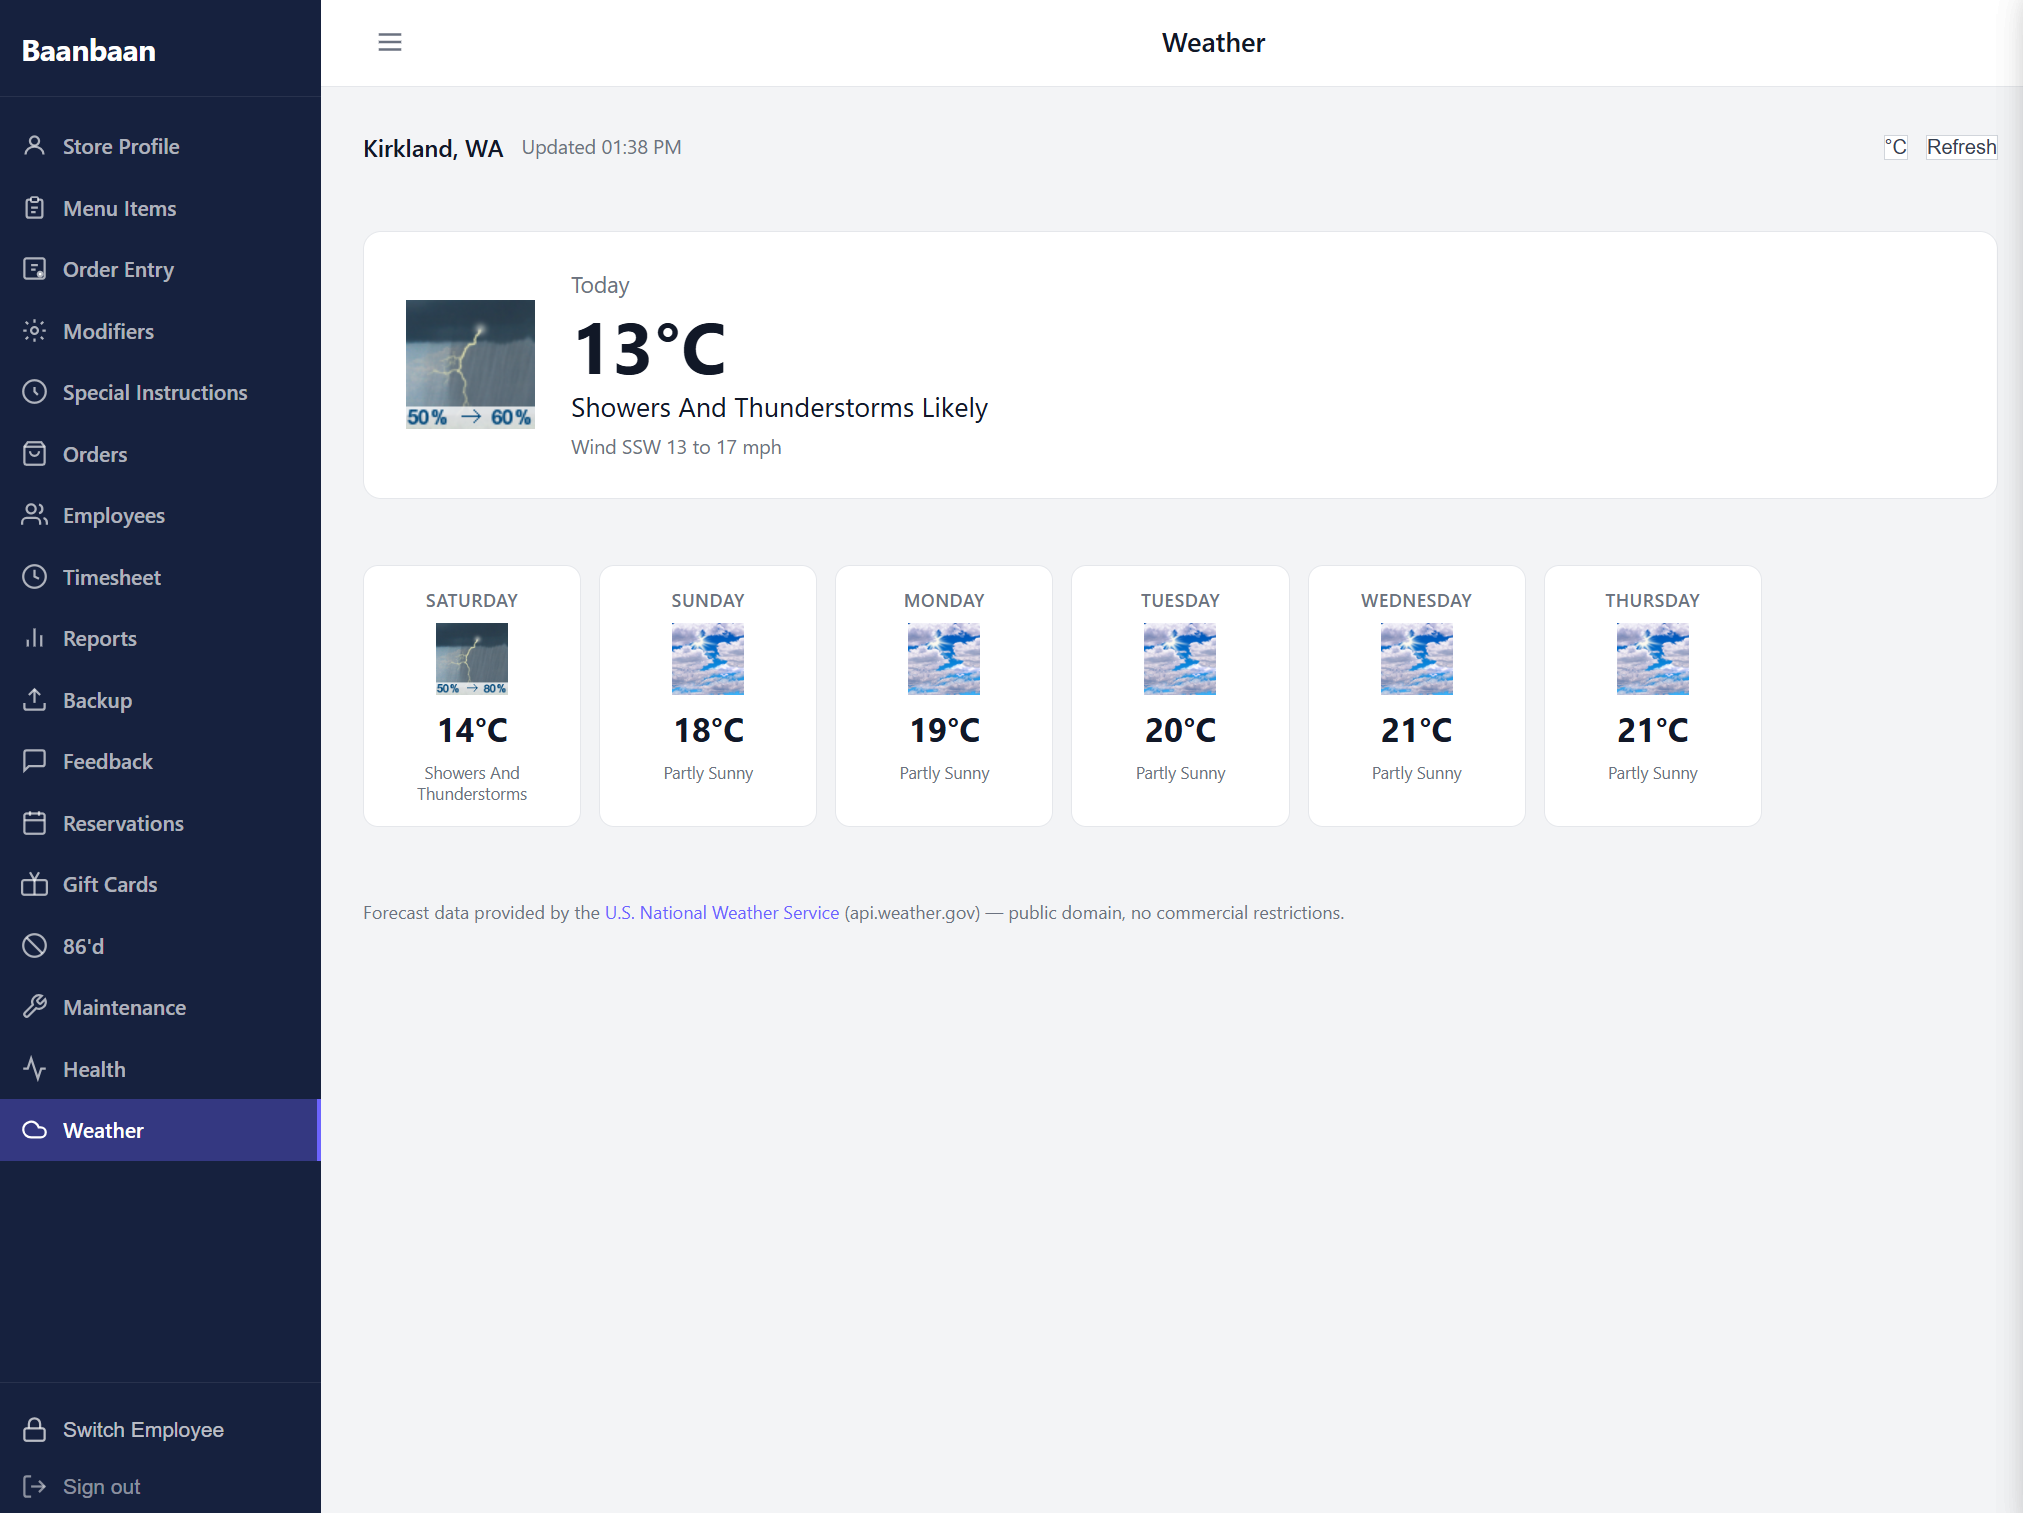
A header strip shows the location, the timestamp of the last refresh, a °F / °C toggle, and a Refresh button. Underneath, a large card for today with the current temperature, conditions (e.g. "Showers and Thunderstorms Likely"), and wind. Below the today card, a row of six daily cards for the rest of the week.
Forecast data is pulled from the U.S. National Weather Service public-domain API; no API key needed, no commercial restriction. The screen is intentionally lightweight — its real value is helping shift leads decide whether to staff up for a sunny Friday or set up the patio for tomorrow's storm.
19. Switch Employee / Sign out
The two buttons at the very bottom of the sidebar:
- Switch Employee — drops the dashboard back to the PIN keypad without signing the owner out. The owner's credentials stay loaded; the next employee just types their PIN. Use this whenever the next server takes over the tablet.
- Sign out — fully ends the owner / manager session. Use this at end of day or when leaving the device unattended.
20. Daily routine
A typical day at the front counter:
- Open with Switch Employee — server taps their PIN to clock in. Their name appears in the top bar.
- As orders come in, ring them on Order Entry; fire each one to the kitchen with 🔥 and capture payment with one of the Pay buttons. Use Move Table if a party shifts seats.
- If an ingredient runs out, hit 86'd (or just say "
out" with the Voice button on Menu Items). The customer ordering site updates within seconds. - Glance at Orders → Online Orders for incoming pickup orders and at Reservations for the day's bookings.
- End-of-shift, check Reports → Tips so the tip-out is fair, and Reports → Partial Payments for anything left open.
- Lock the screen with Sign out or Switch Employee before walking away.
That's the loop. Ring, fire, pay, repeat — and lean on Health, 86'd, and Reports when something breaks the rhythm.